Reporting Tree
Combined with Excel Add-in, the Reporting Tree feature allows you to quickly and easily generate several reports based on specific nodes, all gathered in one place.
Only one Reporting Tree can be used per workbook.
Prerequisites: Make sure to use an Excel file where a Data Extraction is set up and a Formula is defined.
To use the Reporting Tree:
-
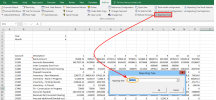
In the Excel file, click Reporting Tree in the menu options. If you are not logged in (refer to Login to SEI Excel Add-in ) a pop-up window will appear so that you may do so.
- Click OK.
-
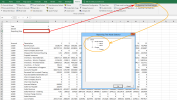
Select the cell in the sheet to be used as reference and click Reporting Tree Node Selector in the menu options. The Reference Cell is the cell that contains the data specific to the nodes existing in the Reporting Tree. It allows you to generate data dynamically when using a Formula or Pivot Tables, or performing a Data Extraction.
You can use wildcards when you enter values in the reference cell. Wildcards can only be used on text strings (not on numbers). Only one logic must be used at a time; for example, you cannot use 4?0*.
-
? replaces one character
-
* replaces multiple characters
Example of filtering values Description 4000 Single value 4* Must starts with 4 4??? Must start with 4 and have a length of 4 characters 4???-???-10 Must start with 4, followed by - and any 3 characters, followed by - and any 3 characters, must finish with 10, and must be 11 characters long
-
-
Select the node from which want to retrieve the data. Here, we select the C4 cell and add a description in the B4 cell.
- Click OK.
Formulas
To create a Formula, select the cell you want to define a Formula for and follow the procedure described in Formula.
Refer to Formula Drill Down to use the Reporting Tree as a Filter to perform drill down.
Data Extraction
To perform a data extraction using the Reporting Tree, refer to Data Extraction.
Please note that refreshing data for the Data Extraction feature can only be done manually by clicking Data Extraction Refresh.
Pivot Table
To create a Pivot Table using the Reporting Tree, refer to Pivot Table.
Please note that refreshing data for the Pivot Tables feature can only be done manually by clicking Pivot Table Refresh.
Open View and Data Entry
For these two features, the Reporting Tree will not be taken into consideration if the Formula is using the Reporting Tree Node as a Filter.
Clear Cache
To clear the cache of Excel Add-in using the Reporting Tree, refer to Clear Cache.
Reporting Tree Duplicator
The Reporting Tree Duplicator feature allows you to replicate the Reporting Tree structure by taking into account only the nodes for which you had checked the Distributable checkbox (refer to Reporting Tree).
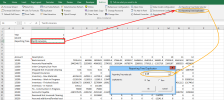
- In the worksheet, select the Reference Cell (refer to Reporting Tree) and click on Reporting Tree Duplicator in the menu options.
-
In the Reporting Tree Node Cell field, the position of the reference cell should be filled in. If not, select the cell.
-
For the Duplicate By option, choose between Tab or Row.
If you choose Tab:
- One sheet per Node (the one with the Distributable checkbox ticked) will be created.
- The tab name will be the one you defined in the Administration screen of the Reporting Tree for these specific Nodes.
- The Description will change in the cell selected on each sheet as well as the ID of the Reporting Tree Node.
- The Formula that refers to the Reporting Tree Node will automatically be refreshed.
NoteThis action can take some time as all tabs need to be generated and all the Formulas will be refreshed at the same time.
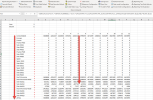
ExampleHere, we chose Duplicate by tab. As North America was the selected node, Excel Add-in automatically added its children (NA10 and NA20).
If you choose Row, the row will get repeated for each node as well as the formulas.
-
Click OK to finish.


