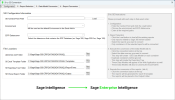
Step 1 - Configuration
By default, the SI to SEI Conversion Tool opens on the 1 - Configuration tab. This tab allows you to load your environment and data sources and specify where the converted files will be placed.
To configure your conversion environment to SEI:
-
In the SEI Central Point Path field, enter the path of your shared folder in this format: \\yourserver\centralpoint.
-
Click the Load button. It will load the information in the Environment and ERP Datasource fields.
-
The Environment drop-down list may contain multiple environments depending on your ERP and SEI configuration.
Select the environment that will be used as the default environment for the converted reports. An Excel report can have multiple environments, but you need to specify a default one. After the conversion, you can switch environments using the Environments Configuration tool from the Add-ins menu.
-
In the ERP Datasource field, select the data source that contains your ERP database (for example: Sage 300). This data source will be used for the creation of SQL views, functions, and stored procedures based on the container definition and the type of request performed in the containers. These SQL objects will be used by the SEI data model to access the data in your ERP.
-
In the Alchemex.svd Folder field, specify the alchemex.svd folder location. This file contains all the definitions of the SI reports and containers. It will be used to create the data models and reports in SEI.
-
In the SI Excel Template Folder field, specify the folder where all the SI templates are located. The file extension of these templates is .xltx.
These templates are used in SI to generate the reports. In SEI they will be converted to the final .xlsx files that you will be able to use and edit as needed. The .xltx files will not be required anymore after the conversion.
-
In the SI Reporting Tree Folder field, enter the folder that contains all your reporting tree definitions. These files have the extension .tre in SI.
These reporting trees will be automatically converted into SEI reporting trees. You will be able to maintain them in the SEI web interface under Administration > Reporting Tree.
-
In the SEI Excel Export Folder field, specify the folder that will contain all the final SEI reports.
This folder is only required temporarily at conversion time. Once the conversion is done, you can take the generated .xlsx Excel files in that folder and move them where you want in your network. We suggest that you store them on a network path where your users will have access to them. These final reports are ready to be used and edited.
-
Click the 2 - Report Selection tab.
