Configure DataSync
DataSync needs to be configured before anyone can use it. The setup process covers three key areas: registering your product license, activating your admin account, and connecting DataSync to your database and email server. The first person to register automatically becomes the initial administrator, which means they are responsible for defining the core settings that affect all users.
Once the intitial setup is complete, the administrator can add users and configure email notifications that alert users when a scheduled job fails. Email notifications are turned off by default for every new user added to the system.
Register for DataSync
Registration ties your product license to the application and creates the first administrator account.
- Open your web browser and go to the server address you set during DataSync installation.
- On the login page, click Register.
- Enter your email address, first name, and last name.
- In the Serial Number field, enter your product license number.
- Click Register.
Once registered, your account appears in the Users list and you receive an activation email to set your password.
Activate the account
- Click the activation link in the email.
- On the password setup page, enter your password in both fields.
- Click Set password.
- Follow the link to log in to DataSync.
Set up DataSync
After your first login, DataSync redirects you to the Settings page. This is where you define how DataSync connects to your database, sends notifications, and who has access. The setup wizard automatically imports settings from your installation, so many fields may already be filled in.
- Review and edit the connection properties and SMTP server settings.
- Under Server URL, enter the URL you want included in email notifications.
- In the Users panel, click Add user to invite members and share access under your license.
- Click Save in each panel to confirm your changes.
Connection properties
These settings control how DataSync connects to its database. If the connection fails or times out, scheduled jobs will not run.
| Property | What it does |
|---|---|
| Server | Name of the server hosting the DataSync database. |
| Database | DataSync database to use, typically the one selected during installation. |
| Username | Database administrator username. |
| Password | Administrator password. |
| Timeout | How many seconds DataSync waits before reporting a connection error. Default: 20. |
| Max Pool Size | Maximum number of simultaneous SQL connections. Default: 100, minimum: 1. This value must not exceed MaxNumberOfJobsRunningInParallel in appsettings.json, or jobs will queue and stall. |
| Encrypt | Encrypts all data exchanged between DataSync and SQL Server. Recommended for production environments. |
| Trust Server Certificate | Enables SSL encryption while bypassing certificate validation. |
| Create database if not exist | Lets DataSync automatically create a dedicated database for connection definitions if one does not already exist. |
SMTP Server settings
DataSync uses an SMTP server to send automated emails, including job failure notifications. Without a valid SMTP configuration, no notifications will be delivered.
| Setting | What it does |
|---|---|
| SMTP Server | Your organization's SMTP server address. |
| Sender Address | Email address that appears as the sender on all messages sent by DataSync. |
| Port Number | network port used to connect to the SMTP server. Common values are 25, 465, or 587 depending on your provider. |
| Connection Mode | Authentication method your SMTP provider requires. Options: None, Network credentials, API key or OAuth 2.0. |
Connection modes
- None
- Network credentials
- API Key
- OAuth 2.0
None
No authentication is required. DataSync connects to the SMTP server and sends emails without any credentials. This works for corporate relay servers that are already restricted by IP address or firewall rules, where the network itself acts as the security boundary.
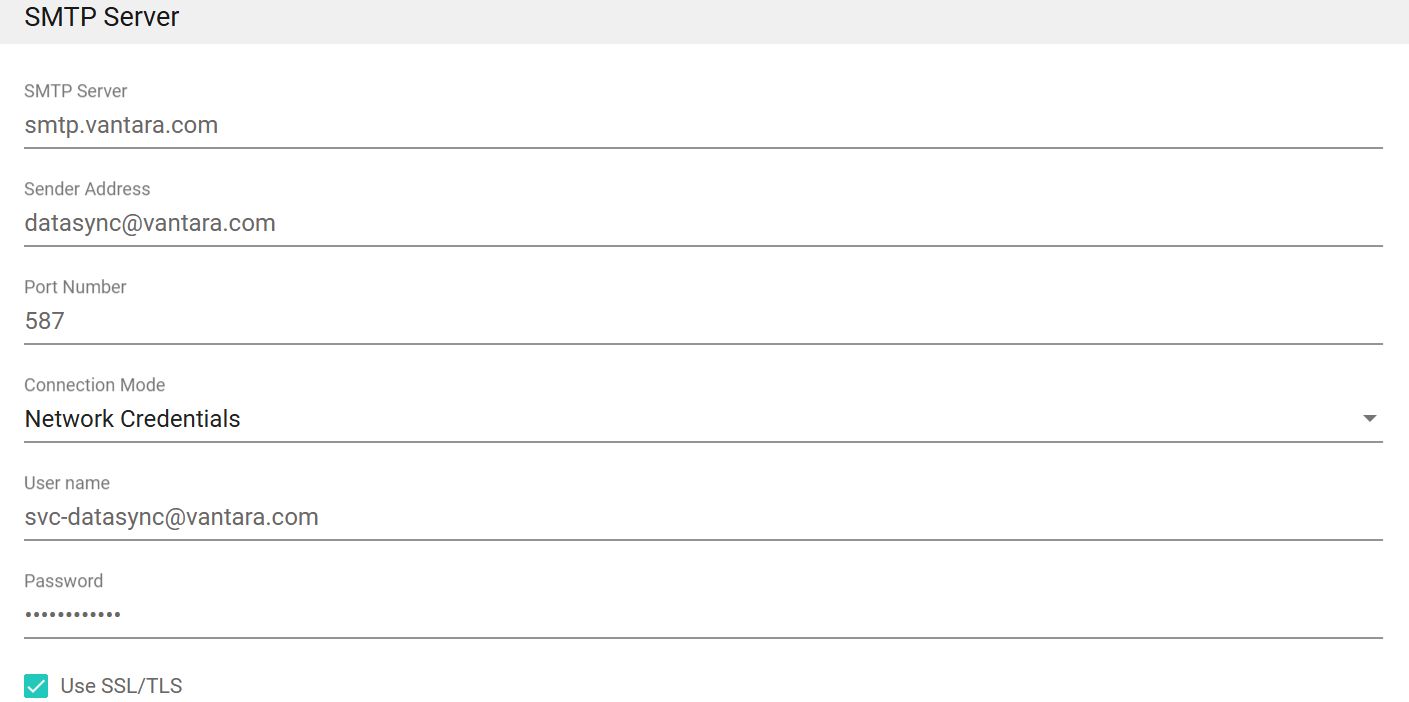
Network Credentials
DataSync authenticates to the SMTP server using a username and password. This is the most common method for on-premises mail servers and many hosted SMTP providers. Choose this option when your infrastructure requires a dedicated service account to send email.
Leaving the Username and Password fields empty is valid. In that case, DataSync connects without credentials, which behaves the same as the None mode.
| Setting | What to enter |
|---|---|
| User name | Administrator email address used for SMTP authentication. |
| Password | Administrator SMTP password. |
| Use SSL/TLS | Encrypts the connection to the SMTP server, protecting both credentials and message content in transit. |
API Key
Instead of a password, your SMTP provider issues a unique API key that DataSync uses to authenticate. This is the standard method for cloud-based email delivery services like SendGrid, Mailgun, or Brevo, which handle email sending on behalf of your organization.
| Setting | What to enter |
|---|---|
| API Key | API key provided by your SMTP provider. |

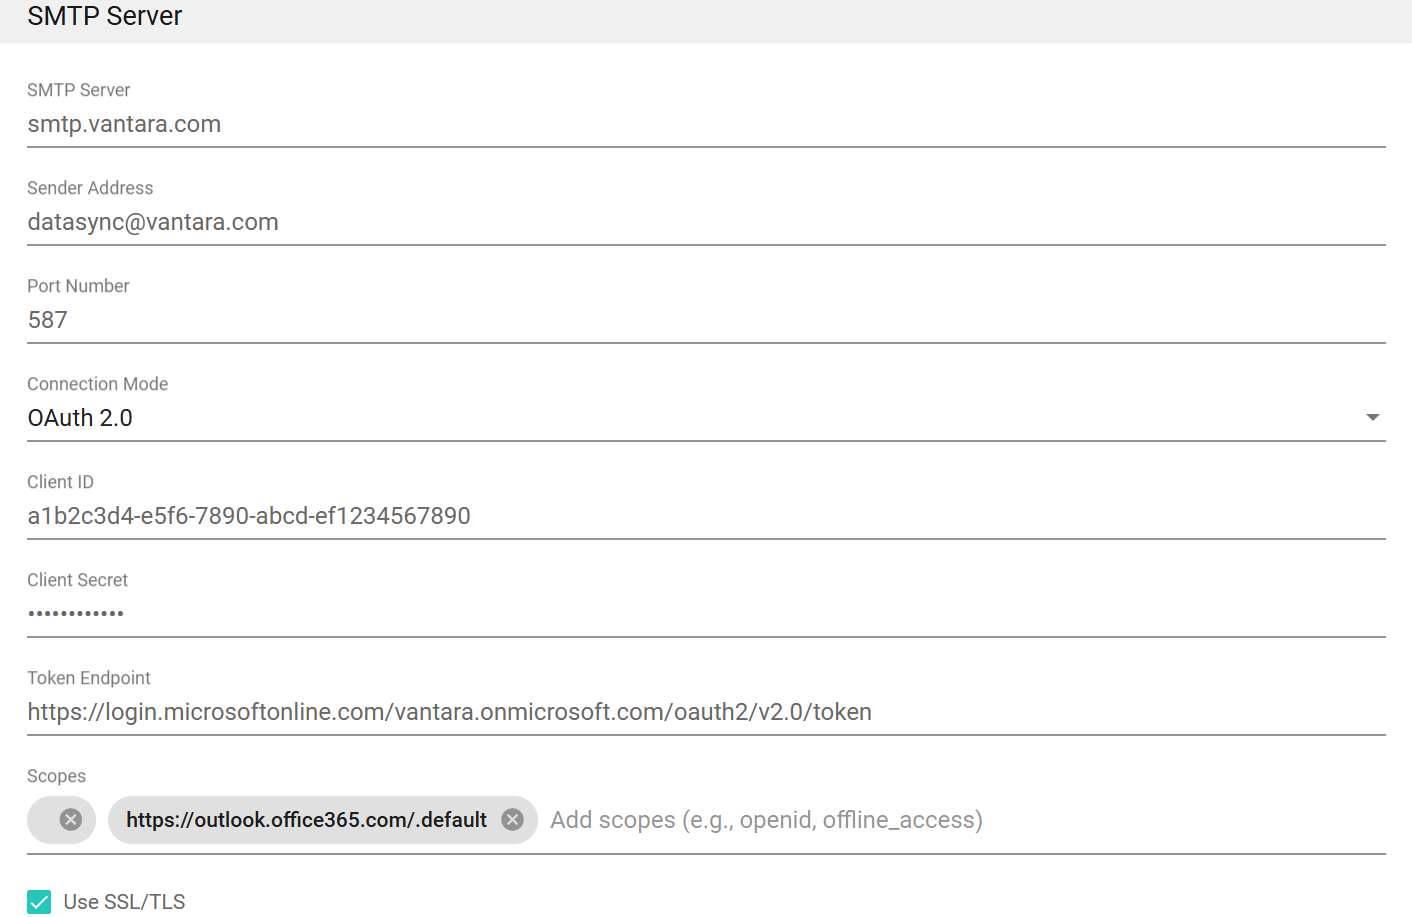
OAuth 2.0
DataSync authenticates using a client ID and secret issued by an identity provider, which exchanges them for a short-lived token to send email. No password is stored, which makes this the most secure option available. This is the recommended approach for Microsoft 365 and Exchange Online environments, as Microsoft is actively phasing out basic authentication. Choose this option when your organization uses Microsoft Entra ID or another modern identity provider, or when IT policy prohibits storing plain-text credentials for service accounts.
For full setup steps, see Configure SMTP with OAuth 2.0.
| Setting | What to enter |
|---|---|
| Client ID | OAuth client ID from your identity provider. For Microsoft Entra ID, this is the Application (client) ID. |
| Client Secret | OAuth client secret value from your identity provider. |
| Token Endpoint | OAuth token endpoint URL provided by your identity provider. |
| Scopes | For Exchange Online SMTP, enter https://outlook.office365.com/.default. |
| Use SSL/TLS | Encrypts the connection to the SMTP server, protecting credentials and message content in transit. |