Configuring the Extractions
After configuring the source and destination connections, you need to import the Sage XRT Advanced zip templates to create extractions.
You then need to validate and build the extractions. This will create the tables and validate all SQL queries or calculated fields. Lastly, you need to run the extractions to populate the database tables.
These procedures must be performed in the order specified below:
If you encounter errors during the import process, perform these steps:
-
OData does not respond or is unavailable. Try the URL in your connection using a web browser.
-
You are missing accesses in the Sage XRT Advanced application. Add the appropriate rights and run the import process again. If you cannot add the rights, remove the tables from the extraction.
1 - Configure the incremental refresh extraction
The incremental refresh extraction is used for Cash and Reconciliation tables that have a valid Last Modified Date.
-
In DataSync, import the extraction (see Importing an Extraction for further details):
-
Click the Import
 icon located on the upper right-hand corner.
-
In the Import Extraction window, click the Choose a zip file hyperlink and browse to the location where you saved the DS_2024.X.XXX_Sage XRT Advanced_Refresh.zip file or drag it directly into that window. Click Next.
-
The default extraction type is already selected. Click Next.

-
In the Description field, enter Refresh for the name.

-
Select the Refresh source connection and the Data Warehouse destination connection.
-
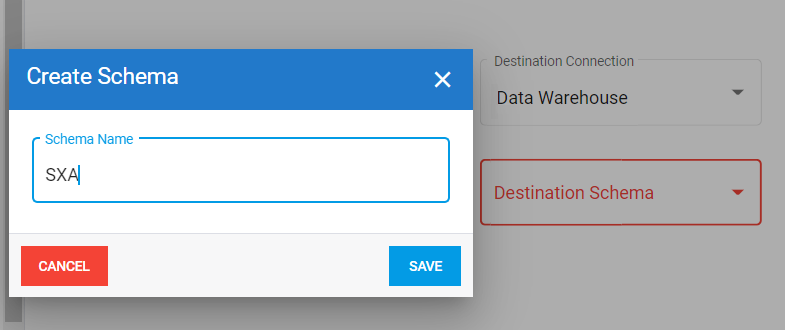
Click Add in the Destination Schema drop-down list to add the SXA schema.

-
Click Import.
-
The Extractions window will automatically switch to the Tables window. Verify your tables and make sure that all fields are present. If some fields are missing, redo the import process.

-
-
Validate and build the Refresh extraction:
-
Click Extractions on the left to return to the Extractions page.
-
Select the Refresh extraction in the list and click the Validate and Build
 icon.
icon.
-
In the Validate and Build dialog box, select the Drop the previously created object and recreate the objects... option and click Build.

- Wait for the process to be done. A validation report is displayed to give you a quick overview once the process is finished. The results are displayed in the Status column. If there is an error, click the hyperlink in the Error column to view the Log Page.
-
-
Run the Refresh extraction:
-
Select the Refresh extraction in the list and click the Run Extraction Now
 icon.
icon.
-
Select the tables to be populated.
-
In the upper-right hand corner, select Truncate and Load and click Run. This will replace all data in your destination with the current data from your source.
-
Wait for the process to be done. When the process is finished, the results are displayed in the Status column. If there is an error, you can view more details on it by clicking on the hyperlink in the Error column, which leads to the Log Page.
-


2 - Configure the Non Incremental Refresh extraction
The non incremental refresh extraction is used for Cash and Reconciliation tables that do not have a valid Last Modified Date.
-
In DataSync, import the extraction (see Importing an Extraction for further details):
-
Click the Import
icon located on the upper right-hand corner.
-
In the Import Extraction window, click the Choose a zip file hyperlink and browse to the location where you saved the DS_2024.X.XXX_Sage XRT Advanced_NoRefresh.zip file or drag it directly into that window. Click Next.
-
The default extraction type is already selected. Click Next.
-
In the Description field, enter No Refresh for the name.
-
Select the No Refresh source connection and the Data Warehouse destination connection.
-
Click Import.
-
The Extractions window will automatically switch to the Tables window. Verify your tables and make sure that all fields are present. If some fields are missing, redo the import process.
-
-
Validate and build the No Refresh extraction:
-
Click Extractions on the left to return to the Extractions page.
-
Select the No Refresh extraction in the list and click the Validate and Build
icon.
-
In the Validate and Build dialog box, select the Drop the previously created object and recreate the objects... option and click Build.
- Wait for the process to be done. A validation report is displayed to give you a quick overview once the process is finished. The results are displayed in the Status column. If there is an error, click the hyperlink in the Error column to view the Log Page.
-
-
Run the No Refresh extraction:
-
Select the No Refresh extraction in the list and click the Run Extraction Now
icon.
-
Select the tables to be populated.
-
In the upper-right hand corner, select Truncate and Load and click Run. This will replace all data in your destination with the current data from your source.
-
Wait for the process to be done. When the process is finished, the results are displayed in the Status column. If there is an error, you can view more details on it by clicking on the hyperlink in the Error column, which leads to the Log Page.
-
3 - Configure the Users extraction
The Users extractions will import the users created Sage XRT Advanced into the SEI Central Point database.
-
In DataSync, import the extraction (see Importing an Extraction for further details):
-
Click the Import
icon located on the upper right-hand corner.
-
In the Import Extraction window, click the Choose a zip file hyperlink and browse to the location where you saved the file DS_2024.X.XXX_Sage XRT Advanced_Security.zip or drag it directly into that window. Click Next.
-
The default extraction type is already selected. Click Next.
-
In the Description field, enter Users for the name.
-
Select the No Refresh source connection and the Central Point destination connection.
-
Click Import.
- The Extractions window will automatically switch to the Tables window. Verify your tables and make sure that all fields are present. If some fields are missing, redo the import process.
-
-
Validate and build the Users extraction:
-
Click Extractions on the left to return to the Extractions page.
-
Select the Users extraction in the list and click the Validate and Build
icon.
-
In the Validate and Build dialog box, select the Drop the previously created object and recreate the objects... option and click Build.
- Wait for the process to be done. A validation report is displayed to give you a quick overview once the process is finished. The results are displayed in the Status column. If there is an error, click the hyperlink in the Error column to view the Log Page.
-
-
Run the Users extraction:
-
Select the Users extraction in the list and click the Run Extraction Now
icon.
-
Select the tables to be populated.
-
In the upper-right hand corner, select Truncate and Load and click Run. This will replace all data in your destination with the current data from your source.
-
Wait for the process to be done. When the process is finished, the results are displayed in the Status column. If there is an error, you can view more details on it by clicking on the hyperlink in the Error column, which leads to the Log Page.
-
4 - Configure the Post Execution Scripts & Currency Rates extraction
The Post Execution Scripts & Currency Rates extraction will create the missing currency rates (e.g., reversing the rate or creating 1-to-1 rates when the same currency is used on both sides. Also, some tables would benefit from incremental refreshes, however they do not have datetime fields for tracking. In these instances, the post-execution scripts insert new records from the current date and can be executed multiple times a day to mimic an incremental refresh. The Post Execution Scripts & Currency Rates extraction must be configured and ran after the No Refresh extraction because it will use the CurrencyRate table created with the No Refresh extraction.
-
In DataSync, import the extraction (see Importing an Extraction for further details):
-
Click the Import
icon located on the upper right-hand corner.
-
In the Import Extraction window, click the Choose a zip file hyperlink and browse to the location where you saved the file DS_2024.X.XXX_Sage XRT Advanced_PostExecScripts.zip or drag it directly into that window. Click Next.
-
The default extraction type is already selected. Click Next.
-
In the Description field, enter Post Execution Scripts & Currency Rates for the name.
-
Select the No Refresh source connection and the Data Warehouse destination connection.
-
Click Import.
- The Extractions window will automatically switch to the Tables window. Verify your tables and make sure that all fields are present. If some fields are missing, redo the import process.
-
-
Validate and build the Post Execution Scripts & Currency Rates extraction:
-
Click Extractions on the left to return to the Extractions page.
-
Select the Post Execution Scripts & Currency Rates extraction in the list and click the Validate and Build
icon.
-
In the Validate and Build dialog box, select the Drop the previously created object and recreate the objects... option and click Build.
- Wait for the process to be done. A validation report is displayed to give you a quick overview once the process is finished. The results are displayed in the Status column. If there is an error, click the hyperlink in the Error column to view the Log Page.
-
-
Run the Post Execution Scripts & Currency Rates extraction:
-
Select the Post Execution Scripts & Currency Rates extraction in the list and click the Run Extraction Now
icon.
-
Select the tables to be populated.
-
In the upper-right hand corner, select Truncate and Load and click Run. This will replace all data in your destination with the current data from your source.
-
Wait for the process to be done. When the process is finished, the results are displayed in the Status column. If there is an error, you can view more details on it by clicking on the hyperlink in the Error column, which leads to the Log Page.
-
5 - Configure the Post Execution Scripts & Currency Rates extraction
The Odata Incremental Refresh extraction is used for Debt and Investment tables that have a valid Last Modified Date.
-
1. In DataSync, import the extraction (see Importing an Extraction for further details):
-
Click the Import
icon located on the upper right-hand corner.
-
In the Import Extraction window, click the Choose a zip file hyperlink and browse to the location where you saved the DS_2024.X.XXX_Sage XRT Advanced_OData_Connector_Refresh.zip file or drag it directly into that window. Click Next.
-
The default extraction type is already selected. Click Next.
-
In the Description field, enter OData Refresh for the name.
-
Select the OData Refresh source connection and the Data Warehouse destination connection.
-
Click Add in the Destination Schema drop-down list to add the SXA schema.
-
Click Import.
-
The Extractions window will automatically switch to the Tables window. Verify your tables and make sure that all fields are present. If some fields are missing, redo the import process.
-
-
Validate and build the OData Refresh extraction:
-
Click Extractions on the left to return to the Extractions page.
-
Select the OData Refresh extraction in the list and click the Validate and Build
icon. -
In the Validate and Build dialog box, select the Drop the previously created object and recreate the objects... option and click Build.
- Wait for the process to be done. A validation report is displayed to give you a quick overview once the process is finished. The results are displayed in the Status column. If there is an error, click the hyperlink in the Error column to view the Log Page.
-
-
Run the OData Refresh extraction:
-
Select the OData Refresh extraction in the list and click the Run Extraction Now
icon. -
Select the tables to be populated.
-
In the upper-right hand corner, select Truncate and Load and click Run. This will replace all data in your destination with the current data from your source.
-
Wait for the process to be done. When the process is finished, the results are displayed in the Status column. If there is an error, you can view more details on it by clicking on the hyperlink in the Error column, which leads to the Log Page.
-
6 - Configure the Odata none incremental extraction
The Odata No Refresh extraction is used for Debt and Investment tables that do not have a valid Last Modified Date.
-
In DataSync, import the extraction (see Importing an Extraction for further details):
-
Click the Import
icon located on the upper right-hand corner.
-
In the Import Extraction window, click the Choose a zip file hyperlink and browse to the location where you saved the DS_2024.X.XXX_Sage XRT Advanced_OData_Connector_NoRefresh.zip file or drag it directly into that window. Click Next.
-
The default extraction type is already selected. Click Next.
-
In the Description field, enter OData No Refresh for the name.
-
Select the OData No Refresh source connection and the Data Warehouse destination connection.
-
Click Add in the Destination Schema drop-down list to add the SXA schema.
-
Click Import.
-
The Extractions window will automatically switch to the Tables window. Verify your tables and make sure that all fields are present. If some fields are missing, redo the import process.
-
-
Validate and build the OData No Refresh extraction:
-
Click Extractions on the left to return to the Extractions page.
-
Select the OData No Refresh extraction in the list and click the Validate and Build
icon. -
In the Validate and Build dialog box, select the Drop the previously created object and recreate the objects... option and click Build.
- Wait for the process to be done. A validation report is displayed to give you a quick overview once the process is finished. The results are displayed in the Status column. If there is an error, click the hyperlink in the Error column to view the Log Page.
-
-
Run the OData No Refresh extraction:
-
Select the OData No Refresh extraction in the list and click the Run Extraction Now
icon. -
Select the tables to be populated.
-
In the upper-right hand corner, select Truncate and Load and click Run. This will replace all data in your destination with the current data from your source.
-
Wait for the process to be done. When the process is finished, the results are displayed in the Status column. If there is an error, you can view more details on it by clicking on the hyperlink in the Error column, which leads to the Log Page.
-
7 - Configure the DI Master Table Refresh extraction
The DI Master Table extraction is used to update the custom DI Master Table.
-
In DataSync, import the extraction (see Importing an Extraction for further details):
-
Click the Import
icon located on the upper right-hand corner.
-
In the Import Extraction window, click the Choose a zip file hyperlink and browse to the location where you saved the DS_2024.0.4.101_Sage XRT Advanced_DIMasterTablesRefresh.zip file or drag it directly into that window. Click Next.
-
The default extraction type is already selected. Click Next.
-
In the Description field, enter DI Master Table Refresh for the name.
-
Select the OData No Refresh source connection and the Data Warehouse destination connection.
-
Click Add in the Destination Schema drop-down list to add the SXA schema.
-
Click Import.
-
The Extractions window will automatically switch to the Tables window. Verify your tables and make sure that all fields are present. If some fields are missing, redo the import process.
-
-
Validate and build the DI Master Table Refresh extraction:
-
Click Extractions on the left to return to the Extractions page.
-
Select the DI Master Table Refresh extraction in the list and click the Validate and Build
icon. -
In the Validate and Build dialog box, select the Drop the previously created object and recreate the objects... option and click Build.
- Wait for the process to be done. A validation report is displayed to give you a quick overview once the process is finished. The results are displayed in the Status column. If there is an error, click the hyperlink in the Error column to view the Log Page.
-
-
Run the DI Master Table Refresh extraction:
-
Select the DI Master Table Refresh extraction in the list and click the Run Extraction Now
icon. -
Select the tables to be populated.
-
In the upper-right hand corner, select Truncate and Load and click Run. This will replace all data in your destination with the current data from your source.
-
Wait for the process to be done. When the process is finished, the results are displayed in the Status column. If there is an error, you can view more details on it by clicking on the hyperlink in the Error column, which leads to the Log Page.
-
8 - Configure the UDF extraction
The UDF extraction is used to synchronize the user defined field.
-
In DataSync, import the extraction (see Importing an Extraction for further details):
-
Click the Import
icon located on the upper right-hand corner.
-
In the Import Extraction window, click the Choose a zip file hyperlink and browse to the location where you saved the DS_2024.X.XXX_Sage XRT Advanced_OData_Connector_UDF.zip file or drag it directly into that window. Click Next.
-
The default extraction type is already selected. Click Next.
-
In the Description field, enter DI Master Table Refresh for the name.
-
Select the OData No Refresh source connection and the Data Warehouse destination connection.
-
Click Add in the Destination Schema drop-down list to add the SXA schema.
-
Click Import.
-
The Extractions window will automatically switch to the Tables window. Verify your tables and make sure that all fields are present. If some fields are missing, redo the import process.
-
Click on Fields from the table in which you want to add UDFs.
-
Click on Add to add fields
-
Enter Description field name, Description, Destination field type and the exact UDF name in Calculation Expression.
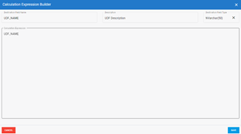
-
Repeat for all UDFs.
-
-
Validate and build the UDF extraction:
-
Click Extractions on the left to return to the Extractions page.
-
Select the UDF extraction in the list and click the Validate and Build
icon. -
In the Validate and Build dialog box, select the Drop the previously created object and recreate the objects... option and click Build.
- Wait for the process to be done. A validation report is displayed to give you a quick overview once the process is finished. The results are displayed in the Status column. If there is an error, click the hyperlink in the Error column to view the Log Page.
-
-
Run the UDF extraction:
-
Select the UDF extraction in the list and click the Run Extraction Now
icon. -
Select the tables to be populated.
-
In the upper-right hand corner, select Truncate and Load and click Run. This will replace all data in your destination with the current data from your source.
-
Wait for the process to be done. When the process is finished, the results are displayed in the Status column. If there is an error, you can view more details on it by clicking on the hyperlink in the Error column, which leads to the Log Page.
-
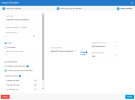
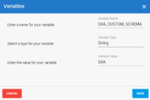
Create and Configure the SXA_CUSTOM_SCHEMA Global Variable
SXA users must now create a Global Variable called SXA_CUSTOM_SCHEMA and set the value to the same schema specified in their extractions (SXA). This allows post-execution scripts to read through data warehouse tables and insert missing fields where needed.
-
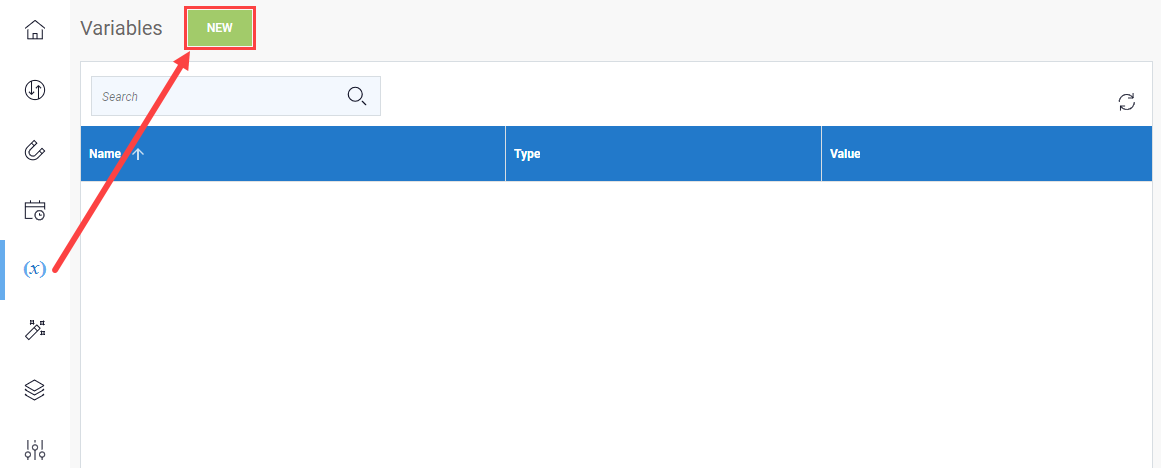
In DataSync, navigate to the Variables menu.
-
Add a New Variable.

-
Configure your variable as pictured below and click Save.
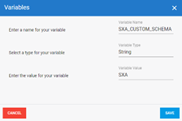
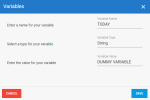
Create and Configure the TODAY Global Variable
SXA users must now create a Global Variable called TODAY as a placeholder variable. This variable will be used and defined in a post-execution script to refresh the daily cash balance.
-
In DataSync, navigate to the Variables menu.
-
Add a New Variable.
-
Configure your variable as pictured below and click Save.