Extracting Data
The web workbook offers the possibility to extract raw data in order to create reports based on this data. Once you have extracted the data, you can use formulas to create the desired results.
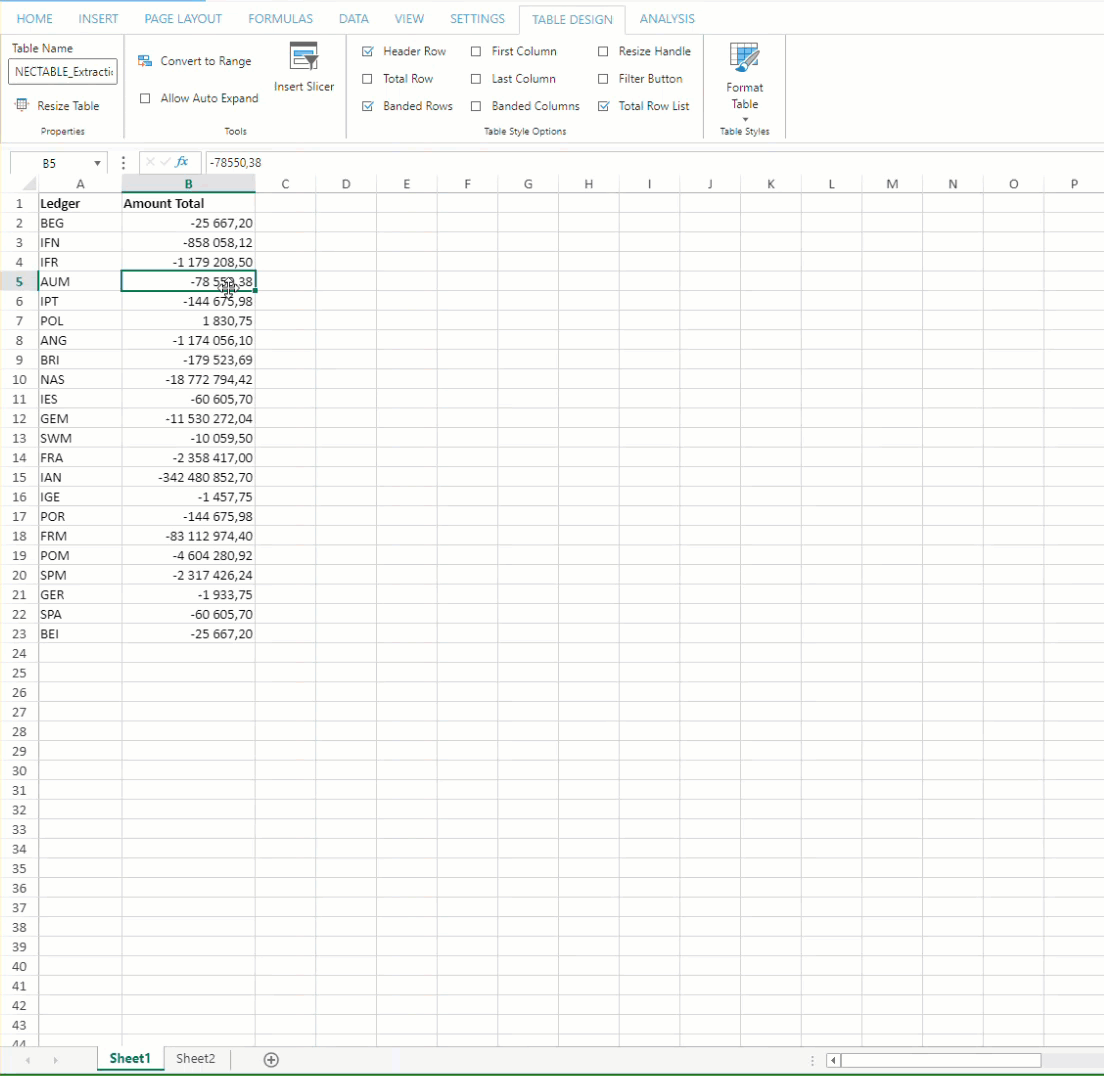
The output of the data extraction is a table control which gives you the flexibility of formatting the header, total row and the row and even adding additional columns. All of the customization to the extraction will continue to work even after refreshing.
Current Limitation:
-
When customizing column headers in Data Extraction, each header must have a unique identifier; reusing names is not permitted, necessitating the creation of a distinct new column name for each customization.
To extract data:
-
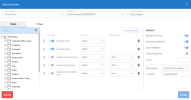
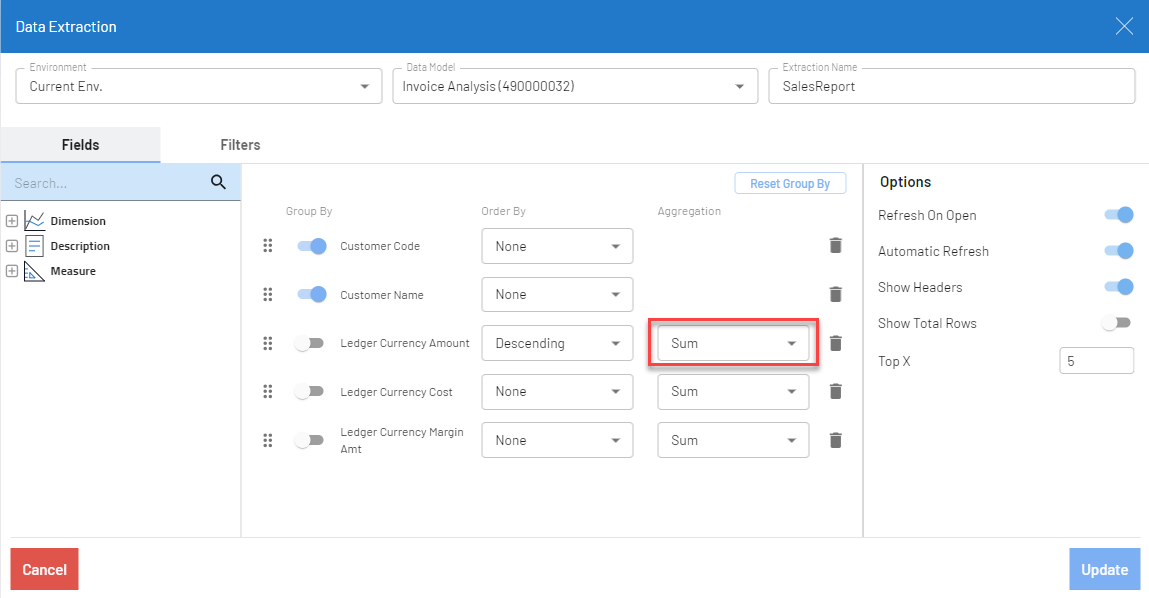
Click Data Extraction Wizard from the Analysis menu. The Data Extraction dialog box is displayed.
-
Select the Environment to be used. If you select the current environment, it will take data from the environment you are currently viewing (as selected in the title bar).
-
Select the Data Model you wish to use for the data extraction.
-
Set the Extraction Name to be used.
-
This name needs to be unique within the entire Workbook as it creates a table definition in the workbook.
-
The name can only contain alphanumerical characters and underscore.
-
-
Select the appropriate options:
- Refresh On Open: This will allow to refresh the workbook every time the workbook is opened.
- Automatic Refresh: This will allow to refresh data upon changes.
-
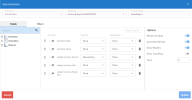
Show Headers: To show headers created by the table for the data extraction or not.
-
Show Total Rows: To show the total row created by the table for the data extraction or not.
-
Top X: To display only a set number of rows.
-
Worksheet: Options to determine where the data extraction will be created.
-
Existing Worksheet: This will use an existing sheet within your workbook and create the Data Extraction in the cell defined.
-
Location: This will display the sheet and the cell where the Data Extraction will be created.
-
-
New Worksheet: This will create a new sheet in your workbook and put the Data Extraction in the first cell of the sheet.
-
-
Select the fields (dimensions, descriptions, and/or measures).
-
For each field, select whether the field will be part of the GROUP BY or will be aggregated. If the field is not selected to be grouped, a list of aggregation will be shown. If the field is selected to be grouped, the drop-down for aggregation will be hidden.
Aggregation allows you to avoid having row repetitions in the drill down and to aggregate the results in one single row.
-
For each field, select how it will be ordered: ASC, DESC, None.

-
-
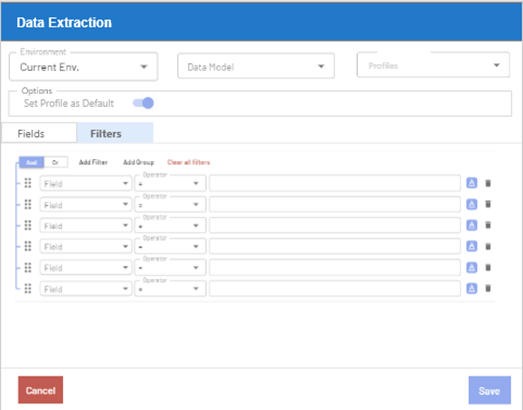
Click the Filters button to add filters.
When referencing a cell as a filter, the Data Extraction will automatically update when the value of the cell changes or other cells referenced by the formula, such as those within SELECTIONPAGE, DatePicker, TimePicker, and MonthPicker components.

-
Click Save.
-
This will create a table based off of the data extraction popup, then it can be formatted the way you want and create adjacent columns for formulas you would like to include.
-
Formatting of the table:
Data Extraction is able to maintain the formatting that is applied to each row. The format that is applied to the entire column is based off the styling done on the first row. -
In Data Extraction, it is possible to replace the default column headers, which are usually auto-generated from field descriptions within the data model. Once a data extraction table is created with these customized headers, the changes are retained. Subsequent refresh actions on the data extraction do not revert these headers to their original data model auto-generated names, ensuring customizations remain intact.
-
Adjacent Columns:
Along with the data extraction created, formula columns can be added next to the Data Extraction which will also be included as a definition of the extraction.
For example, formulas created using Formula Wizard or a simple Excel formula. The moment the cell is dedicated as a formula (includes '=') then it gets automatically added to the Data Extraction definition.In addition, the order of the columns, including the adjacent columns, can be changed by accessing the Data Extraction Wizard again.


Let's look at a step-by-step example of how to create a data extraction.