Embedding SEI into Sage X3
This feature has been available since Sage X3 v7. There are two ways to integrate SEI views:
-
The traditional/simple way is to take the SEI URL component and use it in Sage X3. Use the complete URL as found in Identify the Environment and add it as a widget in Sage X3 (refer to the Sage documentation).
-
The advanced integration allows filtering of SEI views according to the active field in Sage X3. To use this functionality, a patch must be applied.
In every case, you must make Adjustment for Syracuse (starting from X3U9P4 only) to post the SEI elements in Sage X3.
When embedding content from X3, both the SEI server and the ERP must use HTTPS to comply with browser security policies and ensure embedding and SSO work correctly. See Cookie Management for details.
Prepare the Sage X3 server
Adjustment for Syracuse (starting from X3U9P4 only)
- Open the file nodelocal.js with a text editor (Notepad, Notepad++). The default path for this file is: C:\sage\syracuse\syracuse\bin
- After the tag, add x3fusion and the following content (do not forget the initial comma), and change the web application address in "child-src".
,
                security:{
                "http": {
                        // HTTP headers added
                        "headers": {
                                "content-security-policy": {
                                         "child-src": [
                                                "'self'",
                                                "https://biprod.yourcompany.com:444","https://bidev.yourcompany.com:444"
                                         ]
                                },
                        }
                },
                "client": {
                        "iframe": {
                                "sandbox": {
                                        // The html vignettes allow 3 levels of security ('low', 'medium' and 'high') for sandboxing iframes
                                        "low": "allow-same-origin allow-forms allow-scripts allow-downloads allow-popups",
                                        "medium": "allow-same-origin allow-forms allow-scripts allow-downloads allow-popups",
                                        "high": "allow-same-origin allow-forms allow-scripts allow-downloads allow-popups"
                                }
                        }
                }
        }
Adjustment for SAFE X3 Web Server (starting from X3 2021 R2)
-
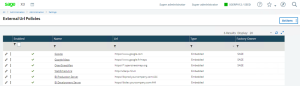
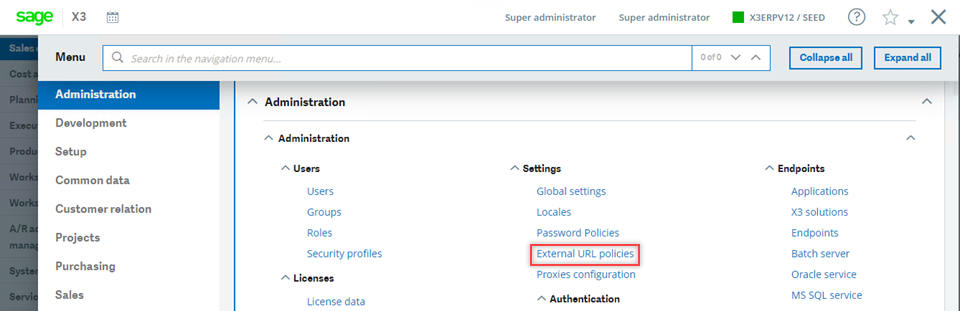
In addition to the previous steps, Sage X3 has introduced a new security feature which allows iframes. Select the navigation menu and then go to Administration > Administration > Settings > External URL policies.

-
Add new rules to match what you previously entered in the Syracuse nodelocal.js file.

Install the Patch
The following steps are given as a guide only and should be supervised by a Sage X3 expert.
- Connect to the X3 folder and navigate to: Development > Utilities > Patch integration (PATCH).
- Choose the type of destination client, if the patch file is accessible from the work station.
- Tick the Patch Integration checkbox .
-
In the Folder list, leave only the files that are required for the patch installation.

NoteInstalling it in the X3 folder is not required.
-
Click OK, choose the pth_ZBITG_XXXXXXXX_VX.dat and scr_ZURLMAKER_XXXXXXXX_VX.dat files, then click on OK again to complete the patch installation.

Identify the Environment
This information is necessary for the section Adjust the SEI parameters in Sage X3 and is found here:
-
In SEI, go to the desired environment and open any view.

- In the Settings menu (right panel), click
 and select View External Link.
 -
In the new external link URL, read the value of envID in the URL and copy it to use in the next step.


Adjust the SEI parameters in Sage X3
- Go to the Sage X3 parameters: Setup > General Parameters > Parameter Values > SUP
- In all the folders where this is required, modify in DEF (default value) the following two parameters (installed by the patch):
| Parameter | Description | Value |
|---|---|---|
| ZBIURLEID | BI Environment ID |
The environment identifier associated with the Sage X3 folder (obtained in the previous step). |
| ZBIURLSRV | BI Web URL |
The URL used to connect to SEI. |
Configure the filter in the screen
The patch is supplied with 2 screens ready to be used and serves as the base to copy for the different possible filters:
- ZBITGEX
- ZBITGEXA: Filters the client on [M:BPC0]BPCNUM
| Action Parameters | Description |
|---|---|
| ZURLDES | Value sent to ZURLMAKER. (no change) |
| ZURLFLD* | Identifies SEI in the field used for the filter (Table.field). |
| ZURLKEY* | Identifies Sage X3 in the corresponding filed serving the filter ([mask]field). |
| ZURLPID | Identifies the SEI data model. |
| ZURLVID | Identifies the SEI view. |
ZURLPID and ZURLVID are found in the following steps with the same environment ID described in Identify the Environment. The parameters to recuperate the URL are respectively PID and VID.

Adding a tab in a Sage X3 window
The following steps are given for information only and should be supervised by a Sage X3 expert.
The screen must be added to a window to be visible. For example, to add a tab in the Customers window:
- In the window (Development > Script dictionary > Window management), identify the Customers window (OBPC).
- In the screen tab, add a line in the screen ZBITGEXA under the tab.

