Login to SEI Excel Add-in
To start the SEI Excel Add-in:
-
Launch Excel or open any Excel file on the computer where the SEI Excel Add-in has already been installed.
-
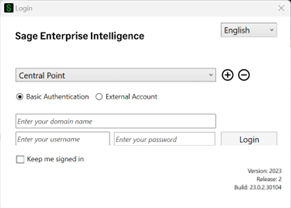
When opening an Excel file already containing some SEI formulas, the Login screen is displayed to let the users authenticate themselves in order to connect to the Central Point.
-
If the Excel file being opened does not contain SEI formulas, the Login screen will only appear the first time you click one of the SEI menu items.

-
-
The top portion of the Login window shows the actual SEI Central Point where you are going to log in. You can select another Central Point by clicking the drop-down arrow or add your own Central Point using the
 sign.
sign.
-
(Optional) Enter your domain name. This should be a valid domain name.
Note: This field should only be used if your SEI user has been created based on your Active Directory user.
-
Enter your user name: This should be a valid user profile defined for SEI access.
-
Enter your user password. If incorrect, access to SEI is denied.
-
(Optional) To keep the connection active, select the Keep me signed in option. To stay signed in for an indefinite period of time, close the session by using the
 of the browser window.
To remove the automatic sign in, Logout. If you clear your cookie browser the connection will be disabled.
-
Click the Language drop-down list to change your preferred language of the software. The Excel Add-in is available in the following languages:
- French
- English
- Spanish
- Portuguese
- Italian
- German
- Turkish
- Chinese (Simplified)
- Chinese (Traditional)
-
Click Login.
-
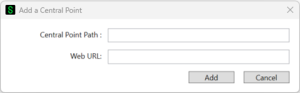
Add a Central Point
The System Administrator will provide you with the information required in this section.
To add a Central Point:
-
In the Login screen, click
.
-
Perform one of the following actions:
-
If your Excel Add-in is installed on premise, fill in the appropriate information:
-
Enter the path of the Central Point folder. For example: \\SERVERNAME\CentralPoint.
-
Enter the App server Web Server URL. For example: http://SERVERNAME:81.
-
-
If your Excel Add-in is installed on the cloud, enter the Cloud URL. For example: mycompany.sageenterpriseintelligence.com.

-


Once the Central Point is added, you will see the name of the Central Point you provided earlier in the drop-down list.