
Sage Intacct
Introduction
The Templates installation provides you with a ready-to-use set of Views, Dashboards and Reports.
The installation (assuming the Central Point is freshly installed and empty), will consist of two steps:
- Configuring the Data Sources for the ERP and Data Warehouse (optional) databases.
- Importing the Templates into the Central Point.
There may be other steps including building and loading the OLAP Cubes.
SEI DataSync
Sage Intacct's data is only accessible from a Cloud platform, so it must be used in conjunction with DataSync.
Prerequisites
- A Sage Intacct production environment
- A destination environment (Cloud or On Premise)
- A valid version of DataSync (refer to Installing DataSync for more information)
Set the Connections
You will need two Source Connections:
- One with the Tracking Type set to Date
- One with the Tracking Type set to None
- DataSync Server Time Zone has to be set to GMT when selecting a Tracking Type by Date.
Configuration in Sage Intacct
To set up the connection between Sage Intacct and DataSync, you need an account with Admin Privileges (User role permissions) for Sage Intacct.
This section helps you configure the integration of Sage Intacct with DataSync so that they can communicate with each other.
- In the upper bar, click on the Company category and select Subscriptions located under the Admin tab.

- In the list, find Web Services and drag the slider to enable it. Ignore the warning about additional charges.

- In the upper bar, click on Overview located in the Company tab.

- In the Company page, under the Setup section, click on Company Information.

- Go to the Security tab and click on Edit.

- Under the Sign-in settings drop-down menu, in the Password section, click on the pencil located under the IP Filter field.

- In the Username field, enter the Company ID provided by Sage (the one you used to login).
- In the IP Address Filter Information window, click on Add.

- In the next window, in the Username field, select the User ID you used to log in.
- In the Start IP Address and End IP Address fields, enter the IP address provided by the Nectari team and click on Save.

- Once your User Name is in the list, you can close the IP Address Filter Information window.
- Back to the Company Information window, scroll down to the Web Services authorizations drop-down menu and click on Add.

- In the Sender ID field, enter NectariMPP and click on Save.


Creating a Role for the User
Before creating a User, you need first to create a Role so that the User can send API requests in DataSync.
- In the upper bar, click on Roles located in the Company tab.

- In the Roles page, click on Add.

- In the Name field, enter Nectari and click on Save.

- In the Roles Subscription page, tick the Application / Module checkbox and click on the Permissions hyperlink.

- In the Permissions window, click on Read-Only, then on Save.


Permissions must be set to Read-Only for all modules/applications listed in this page, to allow / authorize DataSync to retrieve data from Sage Intacct.
- Once this is done, click on Save.


Creating a User
After creating the Role, you can now create the User that will be used to authenticate the connection between DataSync and Sage Intacct.
- In the upper bar, click on Web Services users, located in the Company tab.

- In the Web Services Users page, click on Add.

- Fill in the User ID, Last Name, First Name and Email fields.
- Under the User Type section, select Business.
- Under the Admin Privileges section, select Full.


Sage Intacct will use the email address you enter here to send you the password associated with the User ID you set.
This User ID will be used for the configuration of the connection in DataSync.
Here we defined Nectari as User ID.
- Once this is done, click on the Role Information tab.
- Click on one of the lines and select Nectari in the Role Name drop-down list.

- Click on Save and on OK in the pop-up window.
- In the Password window, enter the password you used to log in your Sage Account and click on Done.

Once the User has been created, it will appear in the list as shown below :
You will also receive an email from Sage Intacct containing the credentials related to this User.
Configuration of Sage Intacct is now complete, so you can now proceed with DataSync connection settings.
Settings in DataSync
- In DataSync, create a new Source Connection.
- In the list, select Sage Intacct.
- In the Connection Properties window:
- In the Description field, enter a name for this connection.
- Paste this URL address https://api.intacct.com/ia/xml/xmlgw.phtml into the URL field.
- For the User ID, Password and Company ID fields, enter the credentials you received in the email from Sage Intacct.
- Once these fields are filled in, change the other settings (Tracking type etc.) according to your preferences.

- Click on Save to finish.

If we base on the User ID we created in the example (Nectari), with real information, this should look similar to this:
Importing the Extractions
This feature allows you to import a pre-defined template or to restore a backup that you may have done yourself with the Export feature (refer to Export an Extraction for more details).
Some pre-defined templates are already available; if you don't have access to them, please contact your partner. An example of a pre-defined template you could use is the one which defines the list of tables and fields to be synchronized to send Sage 300, X3, Acumatica, Salesforce data to the Cloud.
- Click on one of the extractions in the list then on the Import icon located on the upper right-hand corner.

- In the Import Extraction window, click on the Choose a zip file hyperlink to browse to the location you saved the export .zip file or drag it directly into that window and click on Next.

For Sage Intacct, two zip files will be provided.
- Use the DS_EXTR_[Software-Version]_[Extraction-Version]_Sage Intacct with refresh DS-SYNC.zip file for the Source connection with the tracking by Date and the DS_EXTR_[Software-Version]_[Extraction-Version]_Sage Intacct w_o refresh DS-SYNC.zip file for the one with none.
- On the left pane, select the type of extraction you want to perform and click on Next.


For Sage Intacct, it is required to use CPYID for the Column Name.
- Refer to Setup the Extraction Panel to define the extraction and click on Import to finish the process.


- You should have a result similar to this:

If you’ve already created Custom Fields in Sage Intacct, these Fields are not yet synchronized. You will need to go to each of their Tables and check the Sync box. You’ll also need to make these Fields appear in the corresponding Data Models via the Data Model Designer, by double-clicking on the Field in the related Table in order to analyze them.
The Extractions window will automatically switch to the Tables window.
Refer to Add a SQL Query if you want to add SQL statements to some tables and Setup the Field Section to customize the fields (add calculation, change destination name etc.)
Validating and Building the Extractions
Once your extraction (source, destination connection and their related tables) is set up, the next step is to validate the setting of an extraction, before being able to run it.
The feature will:
- Ensure that all the tables/fields exist in the source connections,
- Validate all SQL queries or calculated fields,
- Ensure that the data integrity in the destination connection is not affected (ex: change the table structure).
To do so:
- Select the extraction you want to validate and build in the list and click on the Validate and Build icon.

- In the new window, choose the action which best fits your needs and click on Build (Validate for Migration and Export extraction types).

The choice will be different accordingly to the extraction type you select.
For Synchronization / Consolidation and extraction types:
For Migration and Export extraction types:

- Wait for the process to be done.
A Validation report window will appear to give you a quick overview on the process once it's finished. The results are displayed in the Status column and if there is an error, you will get more details by clicking on the hyperlink in the Error column which leads to Log Page.
Running the Extractions
Once your data have been validated (refer to Validate and Build an Extraction for more details), you can manually run the extraction if you want an immediate result instead of scheduling it.
- Select the extraction you want to run in the list and click on the Run Extraction Now icon.

- In the upper-right hand corner, choose the action you want to execute and the table(s) then click on Run.


Load (for the Migration extraction type only): Loads all data in your destination from your source.
Truncate and Load: Replaces all data in your destination with the current data from your source.
Incremental Load: Retrieves only records that have changed since your last Incremental Load and replace their corresponding records in your destination with the updated ones.
Process Deleted Records: Maximum quantity of days for the validation process to check if records have been deleted based on the last changed date. i.e. If value is set to 30 days, the system will check all the transactions that were created or updated in the last 30 days and then validate if they still exist in the source. If they don't exist anymore in the source, they will be then deleted from the destination.
- Wait for the process to be done.
When the process is finished, the results are displayed in the Status column. If there is an error, you can view more details on it by clicking on the hyperlink in the Error column, which leads to the Log Page.
Data Source Configuration
Environments and Data Sources
The description given to a Data Source created for the first time is used throughout the environments to describe this specific Data Source.
Give a generic description for the first time (e.g. ERP Data Source, Cube Data Source) and if necessary, rename it after the first environment has been created.
The following information is needed to configure the Data Sources:
- Database server credentials: Server name, Instance, Authentication strategy.
- Main ERP database information: Database and schema name.
ERP Data Source
- In the upper-right hand corner, click on the
 to access the Administration section.
- On the left pane, select Env. & Data Sources.
- By default, there is already an environment called Production,
which you can rename by double-clicking in the name box. Once changed, press the Enter
key.

- In the Data Sources section, click on
 Add to create the first Data Source.
- Complete the ERP Data Source configuration. See instructions for MS SQL Server below.


- Datasource description:
- Type:
- SQLSERVER
- Server:
- Database server of Sage Intacct
- Database name:
- Name of the Sage Intacct database (beware of the case sensitivity)
- Database schema name:
- SEI schema:
- Enter the chosen SEI custom schema for the current environment
- Authentication stategy:
- UseSpecific
- User Name:
- SQL User accessing the Sage Intacct database. For example, sa.
- Password:
- The user's password.
- Click on Validate then on Save to complete the configuration of the Data Source.
Importing Templates
For each environment, the following previously configured information will be required:
- ERP Database Name
- SEI Custom Schema
- ERP Schema
Download the Template file: TPL_9.5.XXX_SageIntacct.zip.
The X represents the build number of the template (use the highest available).
Running the Import Template
- In the upper-right hand corner, click on the to access the Administration section.
- In the Administration section, click on the
 Templates drop-down menu in the left pane.
 - Select
 Import Template.
 - Choose the specific location where the new templates will be installed and click on Next.
 Note
NoteUsually, the Root folder is used.

- In the Import Template window, click on Select files....

- Find the folder where you saved the Template.zip file in order to select it then click on Open.
- In the Data Sources Mapping screen, associate the Data Sources (ERP) listed in the Received Data Sources Description column (those from the template) with the Data Sources you previously defined in the Central Point (listed in the Current Data Sources Description column)
- In the Received Data Sources Description column, ensure that only the Data Sources checkboxes you want to use from the template are ticked off.
- In the Current Data Sources Description column, click on Bind a Data Source to access the drop-down list containing the existing Data
Sources and click on Next.

In the next screen all of the Templates content is displayed, against what the Central Point already has.
By default, on the first install, everything will be set to Add (leave everything by default) .
- In the case of a first installation, the first four columns will display None and Never Installed,
the next three will detail the Template content, and the last three gives you the choice to
Add, Update or Skip during the installation.Note
In the case of an update, you can refer to Updating template for more details.
- Click on Next (this can take time).


- Once this has been completed, a window will be prompted to input the necessary parameters to create the custom objects.
- If more than one Environment have been created, you will see a column per Environment. You can untick an Environment checkbox, in which case the Global Scripts will not run in it.
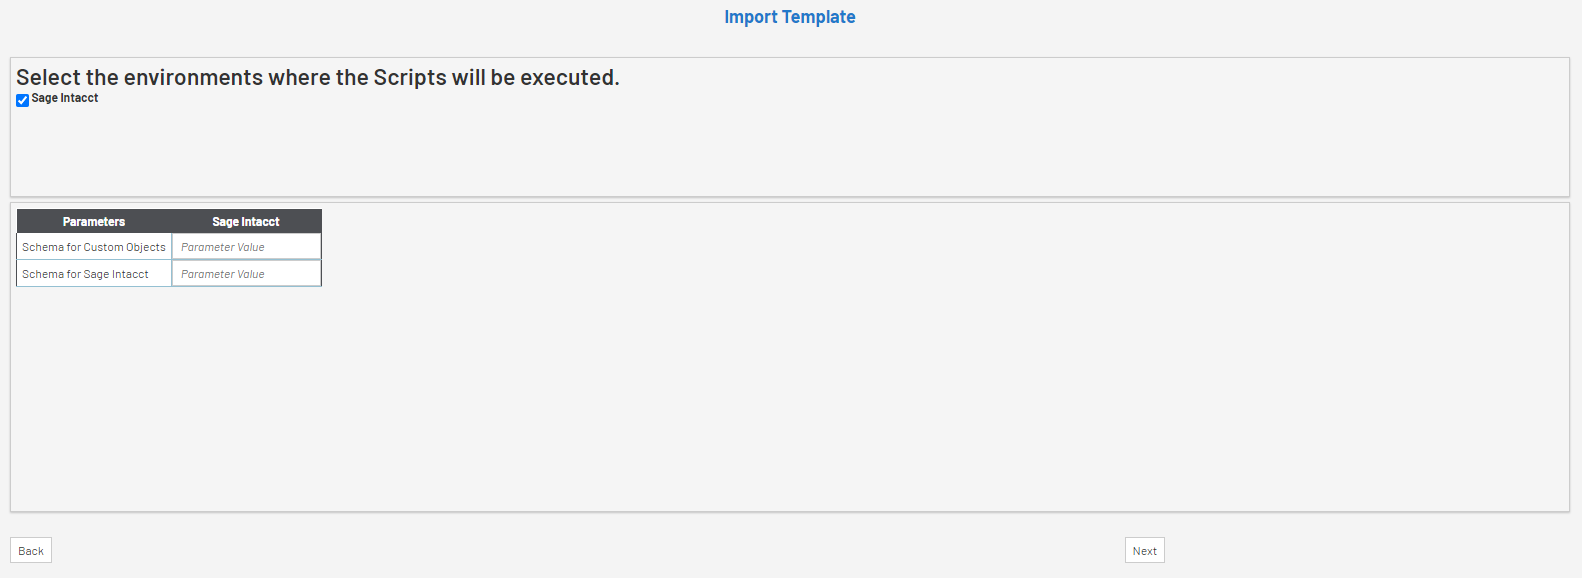
- Complete the parameters, see examples below, and click on Next.


- After importing, an Execution Report will be produced, as shown below.Note
The first section is for the ERP Data Source and the one below it is for the Cube Data Source.
You can click on the
 button to see the details of each script individually. If no failures
are reported, close the window.
button to see the details of each script individually. If no failures
are reported, close the window.

- If any of the scripts failed to run, a fail icon
 will be displayed. Click on the fail symbol to
view the Report Preview window, which shows the respective SQL script.
will be displayed. Click on the fail symbol to
view the Report Preview window, which shows the respective SQL script.
- Copy this script,
debug, and run it separately if needed. Users who are proficient with SQL can debug it
straight in the Report Preview window and run it by clicking on the Try to rerun button.


Updating template
Some considerations you must take into account before starting:
- Making fresh backups of both the SEI database and Central Point before doing a template update is highly recommended.
- Check the SEI Data Models and SEI custom SQL objects that may have been delivered with the initial template version, as you might lose these customizations upon updating.
- You must have a template version that matches the software version installed. If you are using SEI 9, the template should be also 9.
When performing an upgrade of the SEI software, it will only update the software and not the template. In other words, the existing SEI Data Models and Views won't be affected.
After a software upgrade, it is not mandatory to systematically perform a template update. A template update is useful if you have encountered problems with specific SEI Data Models or SEI custom SQL objects as it includes fixes.
To update a template:
- After having mapped the Data sources, tick the checkboxes of the objects you want to upgrade and click on Next.
 Note
NoteBy default, no checkbox in the Update column will be ticked. If there is a new Data Model / View the Add checkbox will be ticked. Select Skip if you want to ignore it.
ImportantIf you tick the Update checkbox, it will overwrite the existing SEI objects associated with that Data Model or connected to the others (dependencies). Please note that if any customizations have been done, they will be lost.

- Select the environment in which the scripts will be executed and click on Next.
- Complete the parameters and click on Next.
- In the Execution report window, If any of the scripts failed to run, a fail icon will be displayed. Click on the fail symbol to
view the Report Preview window, which shows the respective SQL script.
- Copy this script,
debug, and run it separately if needed. Users who are proficient with SQL can debug it
straight in the Report Preview window and run it by clicking on the Try to rerun button.
Web Browsers have updated their policy regarding Cookies and these changes must be applied to your Web Client if you want SEI embedded into your ERP website, or use Single Sign-On (SSO). Refer to Cookie Management for more details.