Configuration Specific to Each System
Use the following links to jump to a section:
Sage X3
Opening Balance
If your accounts are not closed in Sage X3, Opening Balances must be loaded for each fiscal year.
Opening Balances generated from UDM are more detailed than those from Sage X3.
Therefore, this is why we highly recommend that you use Opening Balances from UDM and not the ones generated by the closing fiscal year from Sage X3.
Opening Balances must be generated before the loading of the Finance Staging cube.
To generate Opening Balances:
- Make sure the @@X3SIMULATED global variable is enabled:
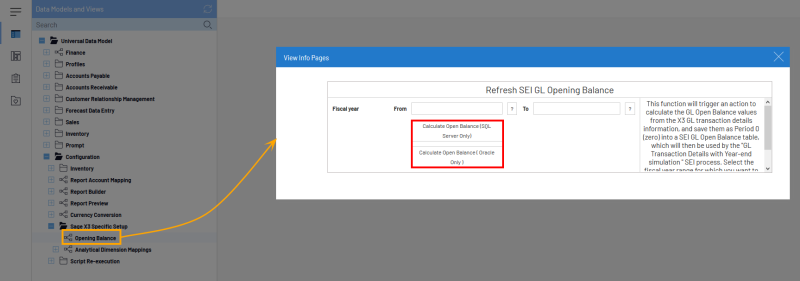
- In the Data Models and Views tab, expand the Universal Data Model folder.
- Expand the Configuration and Sage X3 Specific folders.
- Right-click on the Opening Balance data model and select View Info Pages.
- In the Fiscal Year fields (From and To), enter the year for which you want to generate the Opening Balances and click on Calculate Open Balance depending on your server (SQL or Oracle).
Mapping of Analytical Dimensions
In order to use the Analytical Dimensions, you must first do the mapping before loading the Finance Staging cube.
In order to do so:
- In the Data Models and Views tab, expand the Universal Data Model folder.
- Expand the Configuration and Sage X3 Specific folders.
- Expand the Analytical Dimension Mappings data model and open the Mapping view.
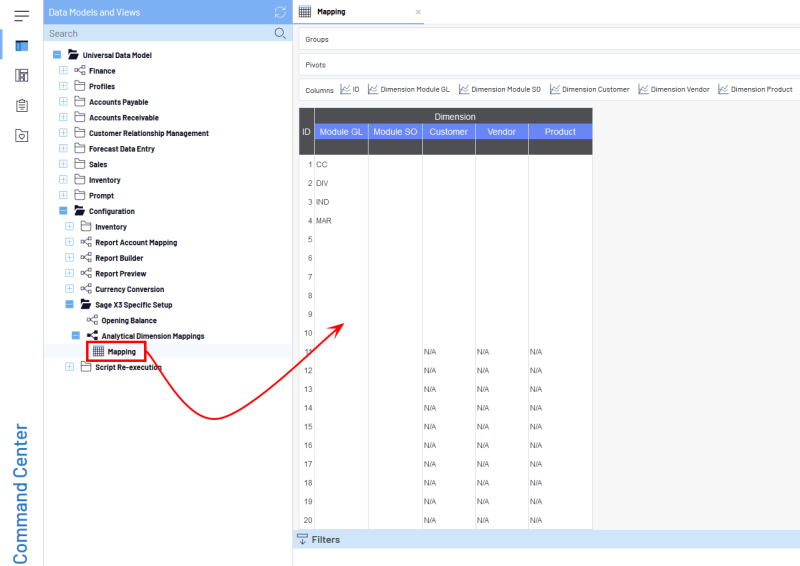
- Click on the cell of the module column then click on the Prompt symbol (purple question mark).
- In the Prompt window, select the Dimension you want to map to the Analytical Dimension ID and click on Confirm.
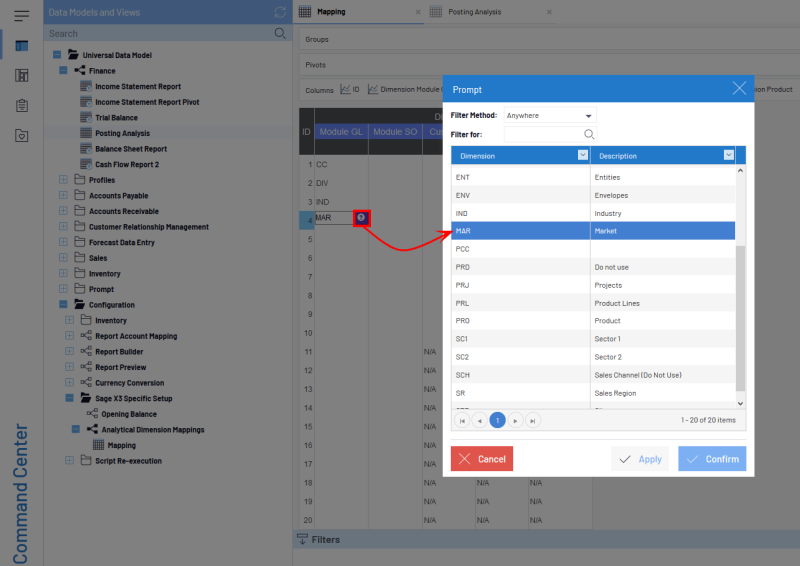
Sage X3 offers Analytical Dimensions for most of modules.
In another hand, UDM allows you to set 5 modules up to 20 Analytical Dimensions per module.
Here, we selected 5 modules (columns) for which we mapped the 4 first Analytical Dimensions only for the first module.
In other words, for the Grand Ledger (GL) Module:
- After having loaded the Finance Staging cube (refer to Building and Loading Cubes for more details), whenever you will use Analytical Dimension (From Analytical Dimension 01 to Analytical Dimension 04 in relation to the example above) in your Views (in the right panel, click on
to get access) from the Finance data model, it is the values you set in the Mapping view that will be used.
Sage 100
For Sage 100, there is no Chart of Accounts to set. Chart of Accounts are the same as Company IDs.
The only thing you need to do is to map the reference currencies to each of the companies.
In order to do so:
- In the Data Models and Views tab, expand the Universal Data Model folder.
- Expand the Finance and Configuration folders.
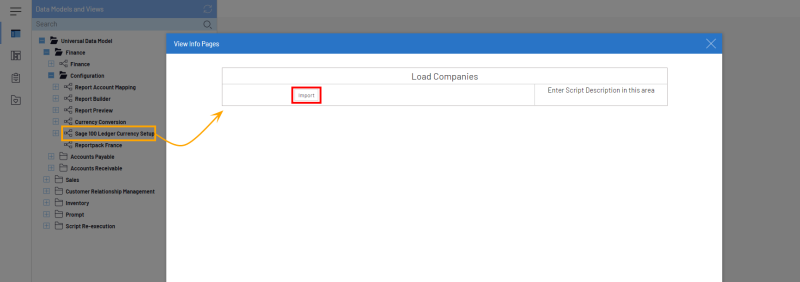
- Right-click on the Sage 100 Ledger Currency Setup data model and select View Info Pages.
- Under the Load Companies section, click on Import and close the window.
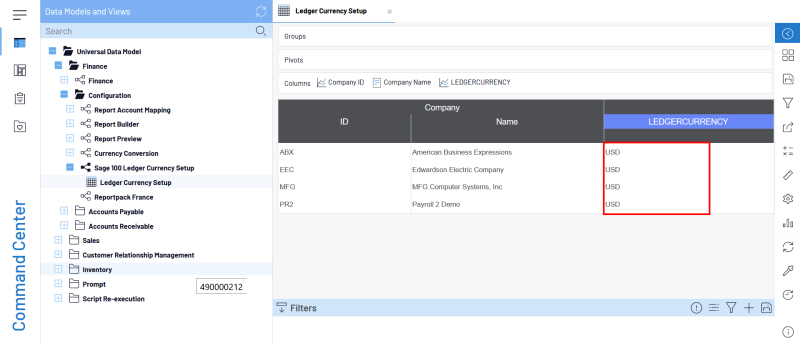
- Expand the Sage 100 Ledger Currency Setup data model and open the Ledger Currency Setup view.
- In the Ledger Currency column, enter for each Company their reference currency.
Sage 300
Mapping of Chart of Accounts
To set Chart of Accounts for each Company available in Sage 300, you need first to import the Companies.
To do so:
- In the Data Models and Views tab, expand the Universal Data Model folder.
- Expand the Finance and Configuration folders.
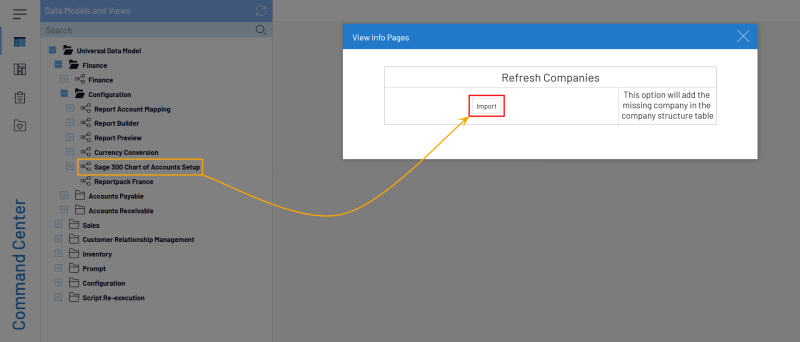
- Right-click on the Sage 300 Chart of Accounts Setup data model and select View Info Page.
- Under the Refresh Companies section, click on Import.
- Once imported, assign to each of them a code of Chart of Accounts.
If the Companies share the same account structure, it is recommended to assign the same Chart of Account.
If not: assign a different code of Chart of Accounts and perform an Account Grouping (refer to Account Grouping for more details).
To assign a code of Chart of Accounts:
- Expand the Sage 300 Chart of Accounts Setup data model and open the Company Setup view.
- In the Chart of Account column, select a row and enter a code.
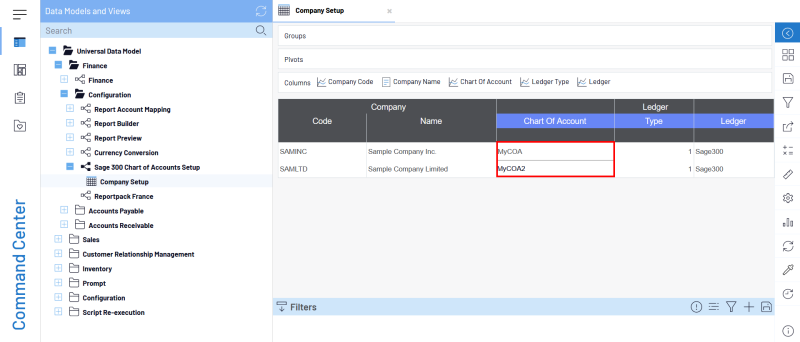
Make sure to use a code with no space and special characters.
Mapping of Analytical Dimensions
No mapping is required for Account Segments as they are already mapped in the UDM DimSubaccounts cube.
Regarding the Account Level Option Fields, compared to the version 8 of SEI, they are now mapped to User Defined Fields (UDF) in the UDM Accounts cube.
In order perform analyses on Optional Fields, we must first map the Optional fields to Analytical Dimensions in UDM.
To do so:
- In the Data Models and Views tab, expand the Universal Data Model folder.
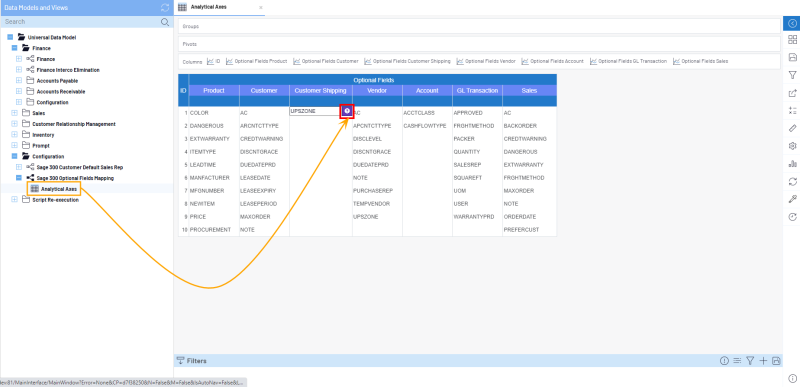
- Expand the Configuration folder and Sage 300 Optional Fields Mapping data model.
- Open the Analytical Axes view.
- Click on one of the row of the Optional Fields columns then click on the Prompt symbol (purple question mark).
- In the Prompt window, select the Field Code you want to map to the Analytical Dimension ID and click on Confirm.
Choosing a default Sales Representatives
In Sage 300, you can assign multiple Sales Representatives to a Customer and assign a Percentage to them but there is no flag(indicator) to define the default Sales Representative. In order to define the default Sales Representative, we need to import the Customers with the 5 possible Sales Representative to a new table.
To assign a default Sales Representative:
- In the Data Models and Views tab, expand the Universal Data Model and Configuration folders.
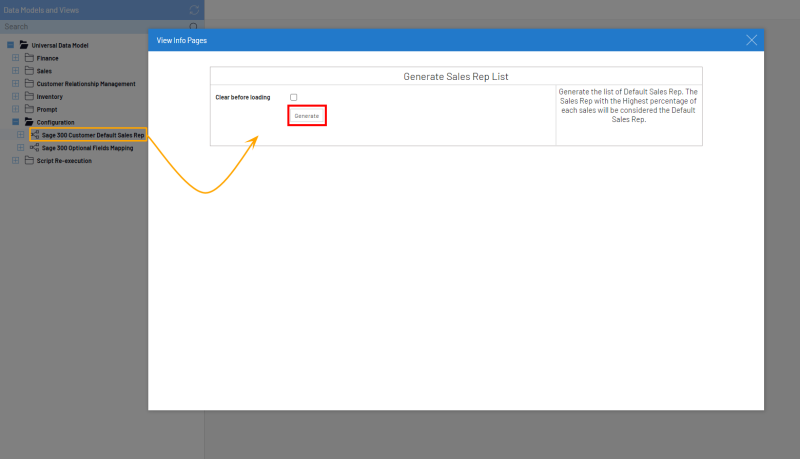
- Right-click on the Sage 300 Customer Default Sales Rep data model and select View Info Page.
- Under the Generate Sales Rep List section, click on Generate.
- Expand the Sage 300 Customer Default Sales Rep data model and open the Default Sales Rep view.
In the generated list, the default Sales Representative is chosen by being the one with a higher percentage than the others. However, in cases where there are 2 Top percentage Sales Representative, you will need to define it manually through the Default Sales Rep column.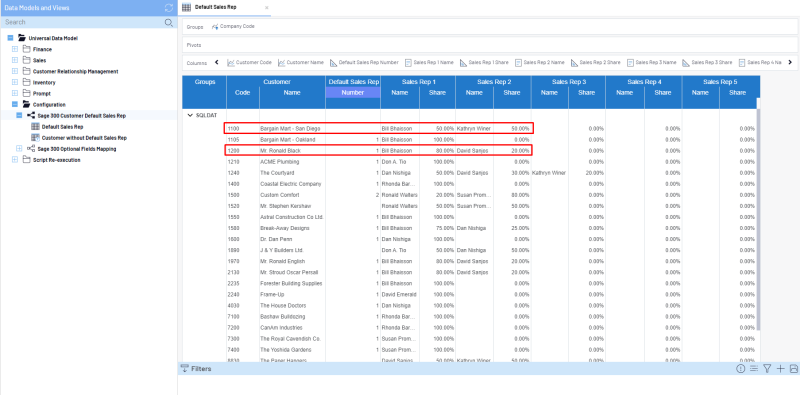
Unless you never plan to use the Default Sales Representative feature on a Customer for your BI Analysis (and use only the one assigned to an invoice or order), you need to re-generate the list as described above whenever you add new Customers.
Acumatica
Mapping of Company
To set Chart of Accounts for each Company available in Acumatica, you need first to import the Companies.
To do so:
- In the Data Models and Views tab, expand the Universal Data Model folder.
- Expand the Finance and Configuration folders.
- Right-click on the Acumatica Chart of Accounts Setup data model and select View Info Page.
- Under the Refresh Companies section, click on Import.
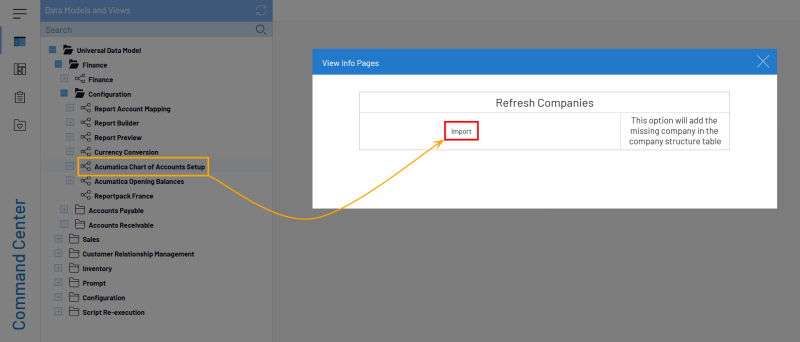
- Once imported, assign to each of them a code of Chart of Accounts.
If the Companies share the same account structure, it is recommended to assign the same Chart of Account.
If not: assign a different code of Chart of Accounts and perform an Account Grouping (refer to Account Grouping for more details).
To assign a code of Chart of Accounts:
- Expand the Acumatica Chart of Accounts Setup data model and open the Company Setup view.
- In the COA column, select a row and enter a code.
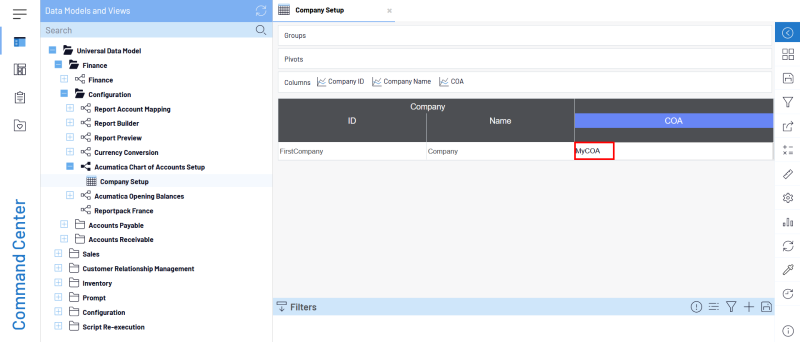
Make sure to use a code with no space and special characters.
Opening Balances
Opening Balances must be generated before the loading of the Finance Staging cube.
To generate Opening Balances:
- In the Data Models and Views tab, expand the Universal Data Model folder.
- Expand the Finance and Configuration folders.
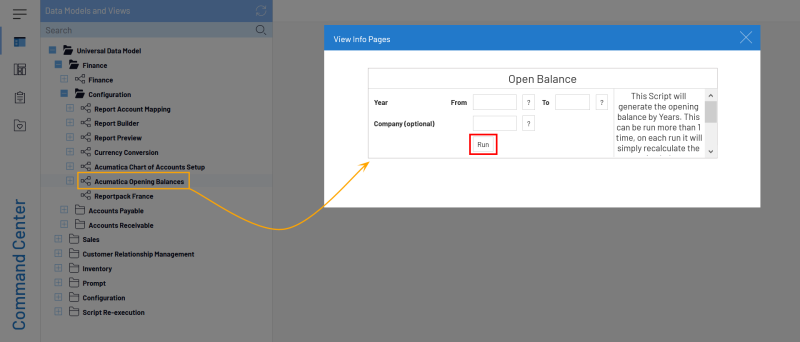
- Right-click on the Acumatica Opening Balance data model and select View Info Pages.
- In the Year fields (From and To), enter the year for which you want to generate the Opening Balances.
- [Optional step] In the Company field, click on the Prompt symbol (question mark) to select the company for which you want to generate the Opening Balances.
- Click on Run.
