
Sage 100 Template
Use the following links to jump to a section:
Introduction
The Templates installation provides you with a ready-to-use set of Views, Dashboards and Reports.
Their installation (assuming the Central Point is freshly installed and empty), will consist of two steps:
- Configuring the Data Sources for the ERP and Data Warehouse (optional) databases.
- Importing the Templates into the Central Point.
There may be other steps including building and loading the OLAP Cubes.
SEI Consolidator
SEI provides a tool that allows you to consolidate multiple Sage 100 databases into one new database.
If you are not consolidating Sage 100 databases, skip the instructions below and go directly to chapter Data Sources Configuration (Data Source Configuration).
For a use with Sage 100 Standard, the ProvideX files must be available from the installation server.
Consolidator Installation
- Run the application SEI Consolidator.exe and click on Next.

- Select the ERP system and click on Next.

- Click on Install.


Consolidator Configuration
To open the Configuration window, use the SEI Consolidator link in the Start menu.
You can also run SageConso.exe found in the installation folder.
Sage 100 Standard

Sage 100 Premium

The following subsections explain the items that can be configured in this window.
Source Server
The SQL server containing the Sage 100 databases being consolidated.
For a ProvideX configuration, ensure that the user has access to all the companies, and the ProvideX files available on a drive.
- Server:
- For Sage 100 Standard: Name of the Sage 100 server.
-
- User:
- For Sage 100 Standard: Sage 100 login ID that has access to the databases being consolidated.
-
- Password:
- Password for the User above.
- Database List :
- The list of databases to consolidate, separated by semicolons.
Target Server
The SQL server containing the consolidated database.
- SQL Server Instance:
- Name and server database instance.
- Database Name:
- Type in the database consolidation name. If it does not already exist, it will be created when the program is run.
- Database Schema:
- Type in the schema used for the consolidated database.
- User:
- SQL login ID with administrator access to the server.
- Password:
- Password for the User above.
SMTP Configuration
If an error occurs while the Consolidator is running, a notification will be sent to you by email.
- Server:
- SMTP server.
- Port:
- SMTP port.
- SSL:
- Check this box to activate SSL.
- User:
- SMTP user
- Password:
- Password for the User above.
- Sender Email:
- Email address sending the notifications.
- Receiver Email:
- Email address receiving the notifications.
Tables to Synchronize
This section allows you to select which Tables to synchronize in the Consolidation Database.
Only the tables checked off will be consolidated.
You can choose to display all Tables or only those that are selected.
The Search Bar allows you to find a table by typing in the name.
Specific configuration for Sage 100 Standard
If you are using the Consolidator where Sage 100 Standard (ProvideX) is installed, you can carry on. Otherwise, you have to install Sage 100 Client on the server where you have installed the Consolidator.
If the databases being consolidated are Sage 100 Standard (ProvideX), the following tab displays additional connection parameters:
The information entered by default represents factory values that are not necessarily the values of your configuration.
By default, we have all the paths to C:\XXXXXX. For remote connection, you have to share C:\Sage folder on the server and change all paths by \\YOURSERVER\Sage\XXXXXX.
- Connection Counter Reset:
- This number represents the number of SQL transactions before the connection with the server is terminated and reinitialized.
- A number that is too high can cause a memory error

- Directory:
- The directory containing the providex.ddf file.
- Prefix :
- Prefix of the database search.
- ViewDLL :
- Directory containing the DLL/SO of the views.

Running the Consolidator
Running the Consolidator is done through the Windows Task Scheduler.
After installing the program, you will find the SEI Consolidator task in the Windows Task Scheduler.
You can select and run it immediately.
By default, the consolidation is programmed to run once a day. In most cases, this is not often enough.
You can modify this frequency by opening the Task Properties.
Load All or Load Incrementally
The Windows Task Scheduler runs the consolidation in Load All mode by default.
The run mode can be modified so that only the changes made during two run sequences are added.
In order to do so:
- Modify the task by selecting it and clicking on Properties.
- In the Actions tab, select the existing Start a program line and click on Modify.
- Change the argument from 1 to 0 and click on OK twice.
- Load all = 1
- Refresh = 0


Uninstallation
To uninstall the Consolidator, use the Uninstall option in the List of Applications in the Windows Configuration panel.
Uninstalling the Consolidator does not delete the consolidated database.
Data Source Configuration
Environments and Data Sources
The description given to a Data Source created for the first time is used throughout the environments to describe this specific Data Source.
Give a generic description for the first time (e.g. ERP Data Source, Cube Data Source) and if necessary rename it after the first environment has been completed.
The following information is needed to configure the Data Sources:
- Database server credentials: Server name, Instance, Authentication strategy.
- Main ERP database information: Database and schema name.
ERP Data Source
- In the upper-right hand corner, click on the
 to access the Administration section.
- On the left pane, select Env. & Data Sources.
- By default, there is already an environment called Production,
which you can rename by double-clicking in the name box. Once changed, press the Enter
key.

- In the Data Sources section, click on
 Add to create the first Data Source.
- Complete the ERP Data Source configuration. See instructions for MS SQL Server below.


- Datasource description:
- Sage 100 Data Source
- Type:
- SQLSERVER
- Server:
- Database server of Sage 100
- Database name:
- Name of the Sage 100 database (beware of the case sensitivity)
- Database schema name:
- Create the two following entries by clicking on the icon (replace DatabaseName by the appropriate value):
- DatabaseName.dbo
- DatabaseName.SEI_CUSTOM_SCHEMA
NoteThis second line contains the SEI Custom Schema.
You can use a different one, but we highly recommend following this naming convention:
- Start with SEI
- Use all capitals
- Separate words by an underscore
ImportantChoose a unique Custom Schema name for each Environment.
- SEI schema:
- Enter the chosen SEI custom schema for the current environment
- Authentication stategy:
- UseSpecific
- User Name:
- SQL User accessing the Sage 100 database. For example, sa.
- Password:
- Password of the user.
- Click on Validate then on Save to complete the configuration of the Data Source.
Cube Data Source
In the same Environment as the ERP Data Source, create a new Data Source for the OLAP Cube.
Complete the Data Source Definition with all the appropriate information.
The screenshot below provides an example of this.
- Server:
- Database server where the SEI OLAP For SQL Server package is installed.
- Database name:
- SEICube.
- Database schema name:
- SEICube.SEI_FOLDER (replace FOLDER by the folder name).
- Where SEI_FOLDER (replace FOLDER by the folder name) is the schema used in the ERP Database of the same environment.
- SEI schema:
- Enter the chosen custom schema for the current environment
- Click on Validate then on Save.
- Click on Set as Data Warehouse to define the Data Source as a Data Warehouse then enter the following information:
- Database warehouse schema:
- Enter the chosen SEI custom schema again.
- Use MARS during the cube loading:
- Unchecked
- Click on Validate then on Save.
Refer to Environments and Data Sources
Import Templates
For each environment, the following previously configured information will be required:
- ERP Database Name
- SEI Custom Schema
- ERP Schema
Download the Template file: TPL_9.X_Sage100Conso.zip.
The X represents the build number of the template (use the highest available).
Running the Import Template
- In the upper-right hand corner, click on the to access the Administration section.
- In the Administration section, click on the
 Templates drop-down menu in the left pane.
 - Select
 Import Template.
 - Choose the specific location where the new templates will be installed and click on Next.
 Note
NoteUsually, the Root folder is used.

- In the Import Template window, click on Select files....

- Find the folder where you saved the Template.zip file in order to select it then click on Open.
- In the Data Sources Mapping screen, associate the Data Sources (ERP) listed in the Received Data Sources Description column (those from the template) with the Data Sources you previously defined in the Central Point (listed in the Current Data Sources Description column)
- In the Received Data Sources Description column, ensure that only the Data Sources checkboxes you want to use from the template are ticked off.
- In the Current Data Sources Description column, click on Bind a Data Source to access the drop-down list containing the existing Data
Sources and click on Next.

In the next screen all of the Templates content is displayed, against what the Central Point already has.
By default, on the first install, everything will be set to Add (leave everything by default) .
- In the case of a first installation, the first four columns will display None and Never Installed,
the next three will detail the Template content, and the last three gives you the choice to
Add, Update or Skip during the installation.Note
In the case of an update, you can refer to Update template for more details.
- Click on Next (this can take time).


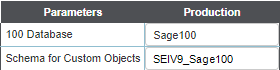
- Once this has been completed, a window will be prompted to input the necessary parameters to create the custom objects.
- If more than one Environment have been created, you will see a column per Environment. You can untick an Environment checkbox, in which case the Global Scripts will not run in it.
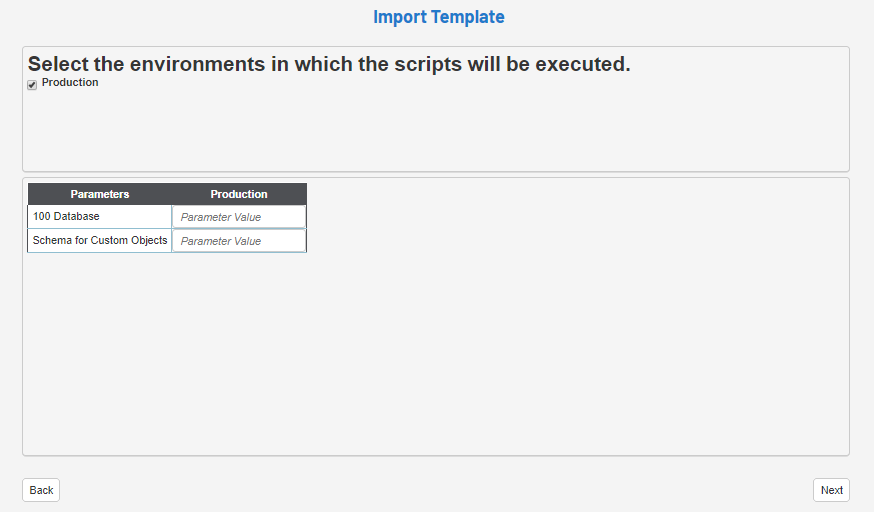
- Complete the parameters, see examples below, and click on Next.
- After importing, an Execution Report will be produced, as shown below.Note
It has a first section for the ERP Data Source and a second one below for the Cube Data Source.
You can click on the
 button to see the details of each script individually. If no failures
are reported, close the window.
button to see the details of each script individually. If no failures
are reported, close the window.

- If any of the scripts failed to run, a fail icon
 will be displayed. Click on the fail symbol to
view the Report Preview window, which shows the respective SQL script.
will be displayed. Click on the fail symbol to
view the Report Preview window, which shows the respective SQL script.
- Copy this script,
debug, and run separately if needed. Users who are very proficient with SQL can debug it
straight in the Report Preview window and run it by clicking on the Try to rerun button.


Update template
Some considerations you must take into account before starting:
- Making fresh backups of both the SEI database and Central Point before doing a template update is highly recommended.
- Check the SEI Data Models and SEI custom SQL objects that may have been delivered with the initial template version, as you might lose these customizations upon updating.
- You must have a template version that matches the software version installed. If you are using SEI 9, the template should be also 9.
When doing an upgrade of the SEI software, it will only update the software and not the template. In other words, the existing SEI Data Models and Views won't be affected.
After a software upgrade, it is not mandatory to systematically perform a template update. A template update is useful if you have encountered problems with specific SEI Data Models or SEI custom SQL objects as it includes fixes.
To update a template:
- After having mapped the Data sources, tick the checkboxes of the objects you want to upgrade and click on Next.
 Note
NoteBy default, no checkbox in the Update column will be ticked. If there is a new Data Model / View the Add checkbox will be ticked. Select Skip if you want to ignore it.
ImportantIf you tick the Update checkbox, it will overwrite the existing SEI objects associated with that Data Model or connected to the others (dependencies). Please note that if any customizations have been done, they will be lost.

- Select the environment in which the scripts will be executed and click on Next.
- Complete the parameters and click on Next.
- In the Execution report window, If any of the scripts failed to run, a fail icon will be displayed. Click on the fail symbol to
view the Report Preview window, which shows the respective SQL script.
- Copy this script,
debug, and run separately if needed. Users who are very proficient with SQL can debug it
straight in the Report Preview window and run it by clicking on the Try to rerun button.
Building and Loading the OLAP Cubes
To create the Cubes database structure in the SEICube database previously installed, you need to Build the Cube.
- In the upper right-hand corner, click on the to access the Administration section.
- In the left pane, click on
 OLAP Manager.
 - In the right pane, click on
 Manage.
- In the left section, select all the Cubes to build by ticking the checkbox next to the Description column.
- In the Manage window, select Build in the Action drop-down list then the environment(s) and click Confirm.

- In the Confirmation window, tick the checkbox and click on Yes.

- If errors occur refer to Logs


Now that the Cubes are built, you can now populate them.
- In the right pane, click on Manage.
- In the left section, select all the Cubes to load by ticking the checkbox next to the Description column.
- In the Manage window , select Load All in the Action drop-down list then the environment(s) and click Confirm.

- In the Confirmation window, tick the checkbox and click on Yes.

The template installation is now complete.
Regular data refresh jobs for the Cubes can now be scheduled.
For this, you can refer to Scheduler
Populate Zip Codes
During the import, a table is created in the SEI Custom Schema for ZIP codes.
Although the ZIP table is not critical for the Sage 100 Template, it is recommended to download and populate the ZIP table with a recent data dump of ZIP codes including the (latitude, longitude) details.
Web Browsers have updated their policy regarding Cookies and these changes must be applied to your Web Client if you want SEI embedded into your ERP website, or use Single Sign-On (SSO). Refer to Cookie Management for more details.