Customizing your API
This page is reserved for users who want to customize an API Profile to meet their specific needs.
By customizing, we are referring to the possibility of either creating an API Profile from scratch or editing an existing profile by retrieving only the data you are interested in.
This data uses values (keys) from Attributes to build and define the Columns of the Table.
In both cases, you need to map your API Profile to the API Provider through its URI address.
Prerequisites
Before starting, make sure that you have file archiver software such as WinZip, 7-zip or Winrar installed on your computer to extract Tables from the API Profile.
Tables (.rsd files) are included in API Profile files (.apip extension) where API Profiles are understood by the system as .zip files.
.rsd type files are schema files used to:
- Input parameters regarding the management of the Endpoints
 is one of the touch points of a communication channel (its extremities). It defines the location from which APIs can access the data they want to retrieve and display in the API.
 - Define how Rows are displayed in the Table.
We highly recommend you to install Postman software to help you in this process, as it gives you a clear view of the API Profile structure (i.e., how Attributes are nested). Click here to go to their download page (it's free).
Setting up Postman
When Postman is installed, open Postman and do the following:
- In the upper right-hand corner, click on the settings icon (wrench key) and select Settings.

- Under the General tab, in the Max Response Size in MB field, set 0 as the value, so that Postman can retrieve data of unlimited size.
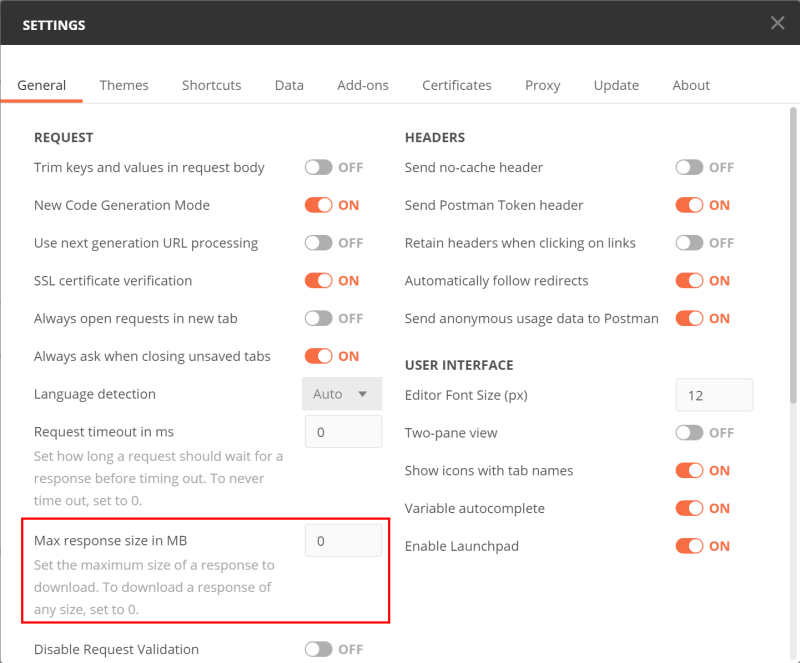
- Click on the X to save your change.
This change is only required the first time you use Postman.
Understanding the .rsd file structure
Before creating the custom API profile, we first need to understand what elements this file is composed of.
<api:script>
	<api:info>
		<attr/>
	</api:info>
	<api:set attr="ContentType" value="application/json" />
	<api:script method="GET" >
		<api:set attr="method" />
		<api:set attr="uri" />
		<api:set attr="RepeatElement" />
		<api:set/>
		<api:call>
			<api:push/>
		</api:call>
	</api:script>
</api:script>
| Tag | Description |
|---|---|
| <api:script> |
The first <api:script> tag acts as the <body> tag in an HTML file. Its values can be understood as the one you find in the <head> tag in an HTML file, i.e, its metadata remain the same. Example: |
| <api:info> |
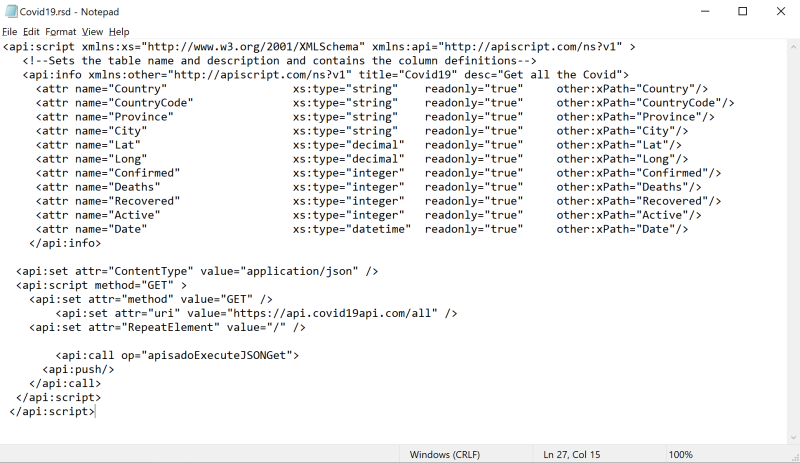
This tag sets the Table name and Description through the title and desc parameters. It also contains the parameters proper to Columns called Attributes (attr). The Attributes which can be used differ from one API Provider to another but three parameters remain mandatory: name (name), data type (xs:type) and the path (other:xPath). Example: For the data type (xs:type), here is a list of the most used values:
|
| <api:set> |
Within the first <api:script> tag, Global Parameters are defined. <api:set attr="ContentType" value="application/json" /> = indicates the type of content that will be returned by the API. This value never changes. <api:set attr="RepeatElement" value="/" /> = is used when the data to be retrieved are not accessible directly from the Root level, i.e., there is a sub-level (refer to Common Steps and Information for more details). If so, replace the "/" with the name of the element as Value. This will be explained in further details in Specific Steps to Advanced Case. |
| <api:script> |
The second <api:script> tag refers to the HTTP Method that will be executed by the script. Example: A <api:set> tag is required to implement the method (refer to the section below for more details). |
| <api:set> |
The <api:set> tags within the second <api:script> tag is used to implement the HTTP Method and defines from which URL address (URI) the data should be retrieved. Regarding the HTTP Methods, you can use: GET, POST, PUT/PATCH/MERGE, and DELETE that correspond to SELECT, INSERT, UPDATE, and DELETE respectively. GET is the most used method. Example: |
| <api:call> |
This tag is used to call operations through the op parameter. It will be followed with the <api:push> tag to display (push) the result in Data Sync. Authorized operations differ from one API Provider to another. Example: |
Creating a custom API Profile
In this document, two cases of API creation will be discussed according to their difficulty level, i.e., how Attributes are nested.
- For the simple case, the data related to the COVID-19 coronavirus from the Covid19 API will be used, as the tree structure is easy to understand and simple (i.e., Attributes are at the Root level) for building and consolidating your knowledge base.
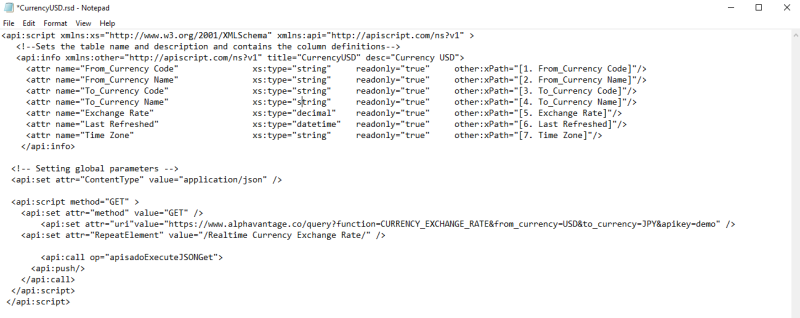
- For the advanced case, the data related to Foreign Currency Exchange (ForEX) from Alphavantage API will be used to discover what is involved when the Attributes are not at the Root level.
- Open a text editor such as Notepad and copy and paste the following lines into your document:
<api:script xmlns:xs="http://www.w3.org/2001/XMLSchema" xmlns:api="http://apiscript.com/ns?v1" > <api:info xmlns:other="http://apiscript.com/ns?v1" title="A Title" desc="A Description"> - For the title and desc values, enter a title and a description (preferably related to the information you want to retrieve from the API).
- Save your document as a .rsd file.
The value of the title attribute that you enter in the <api:info> tag must be identical to the file name when saving the file. This value is used to define the Table Name and is the Unique Identifier of the Web API when adding a Table for an Extraction.
- Go to the documentation section of the API Provider. In this case it is the Covid19 API.
- Copy the URI address which contains the data you are interested in. For this example, All Data (https://api.covid19api.com/all) is chosen so that all data can be retrieved.
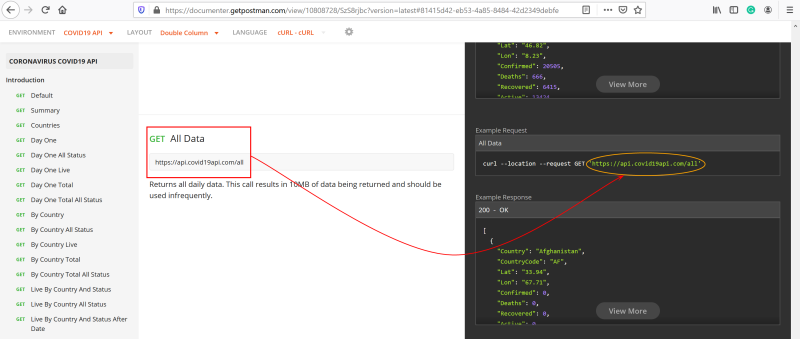
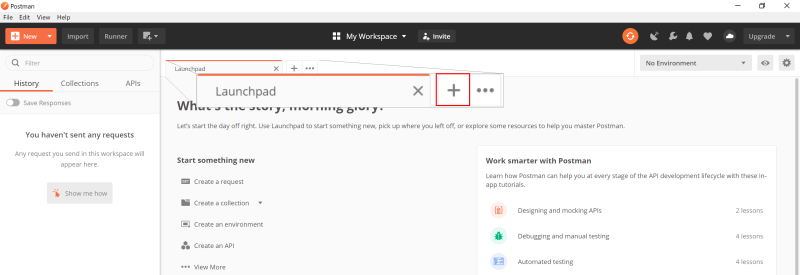
- In Postman, click on the + next to the Launchpad tab to create a new one.
- In the GET field, paste the URI address and click on Send.

- As you can see from the screenshot below, the Attributes are accessible directly from the Root, i.e., there is no element name prior the "{" sign.

- Returning back to your Notepad, add the following line to create the columns of the table.
<attr name="X" xs:type="X" readonly="true" other:xPath="X"/> - To make it easier to define the values, place Postman on one of the side of your screen and the Notepad on the other side.

- Replace the X values as follows:
| attr name="X" | Replace the "X" with a name (preferably) linked to the data that will be retrieved from the other:xPath section. In this example, it would be Country, Country Code, Province etc. |
| xs:type="X" | Replace the "X" with the data type of the attributes listed in the API. In this example, it would be string if Country or CountryCode is chosen as Attribute or integer if Deaths or Confirmed is chosen (refer to Understanding the .rsd file structure for further details regarding the list of data types). |
| readonly="true" | The property assigned to this attribute. In this case, this property does not add anything special and is completely optional (by default, all Attributes are read). |
| Specific Property | If you need to add a property, this will be at this location you should insert it. For example, if you want to assign a Primary Key to an Attribute you could add key="true". |
| other:xPath="X" | Replace the "X" with the path where the Attribute is located in the API. In this example, as Attributes are located at the Root level, just repeat their Name as value for the xpath. |
- Duplicate this line to add as many Attributes as you want and change the values according to their Data Type as presented in the table above.
- Once your list of Attributes is complete, close it by adding the </api:info> tag.
- Copy and paste this line in your Notepad to set up the Global Parameters.
<api:set attr="ContentType" value="application/json" /> - Copy and paste the following lines to define the Script Method that will be used.
<api:script method="GET" > <api:set attr="method" value="GET" /> <api:set attr="uri" value="X" /> <api:set attr="RepeatElement" value="X" /> - Replace the X values as follows:
| api:set attr="uri" value="X" | Replace the "X" with the same URI address you pasted in Postman to get the data. In this example, it would be https://api.covid19api.com/all. |
| api:set attr="RepeatElement" value="X" | Replace the "X" with a "/" since the data in this example are retrieved from the Root level, i.e, there is no Attribute name prior the "}". Refer to Specific Steps to Advanced Case if there is a Repeated Element (Attribute) with Items (i.e, Sub-Attributes) with space in their names or if there is an array among the Items you want to retrieve the data from. |
- Copy and paste the following lines in your Notepad to finish the creation of your Custom API.
<api:call op="apisadoExecuteJSONGet"> <api:push/> </api:call> </api:script> </api:script>
- Once the .rsd file is completed:
- Follow the procedure described in Settings for Custom API to create and configure a new Connection (refer to Authentications for more details).
- Follow the procedure described in Add an Extraction and Setup the Extraction Panel to define the extraction.
- Follow the procedure described in Run an Extraction to retrieve the data.
Specific Steps to Advanced Case
For this section, we use the data related to Foreign Currency Exchange (ForEX) from Alphavantage API as the Attributes are not at the Root level.
This section is composed of two examples: the first example is about data retrieval from a RepeatElement which is not at the Root level and the second one is about retrieving data when the RepeatElement is a Variable.
First Example
- Repeat the steps described in Common Steps and Information until step 7.
- As you can see from the screenshot below, the Attributes are not accessible directly from the Root, i.e., there is an element name prior the "{" sign. In this case, the element name is Realtime Currency Exchange Rate.
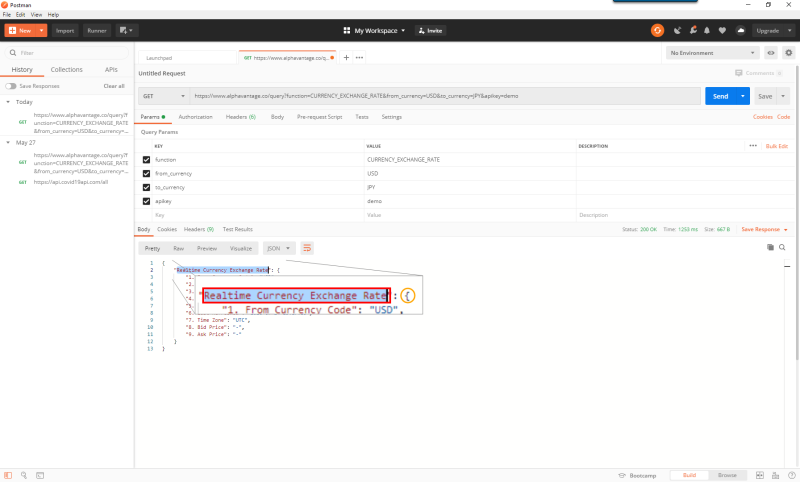
- Use the steps described in Common Steps and Information from step 9 until the end to build your API Profile.
- For the api:set attr="RepeatElement" value="X" tag, replace the X value with the value which is placed prior the "{" sign in the following format: /value/. In this case, it is Realtime Currency Exchange Rate.
- If the Attributes have special characters such as an underscore, spaces, or words with accents, place the value as is into square brackets [] in the other:xPath section.
- Once the .rsd file is completed:
- Follow the procedure described in Settings for Custom API to create and configure a new Connection (refer to Authentications for more details).
- Follow the procedure described in Add an Extraction and Setup the Extraction Panel to define the extraction.
- Follow the procedure described in Run an Extraction to retrieve the data.
Second Example
In this section, we explain how to retrieve data which is not at the Root level and when the RepeatElement is a Variable.
- Repeat the steps described in Common Steps and Information until step 7.
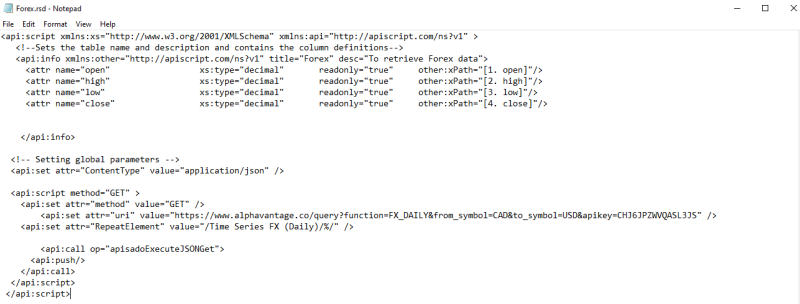
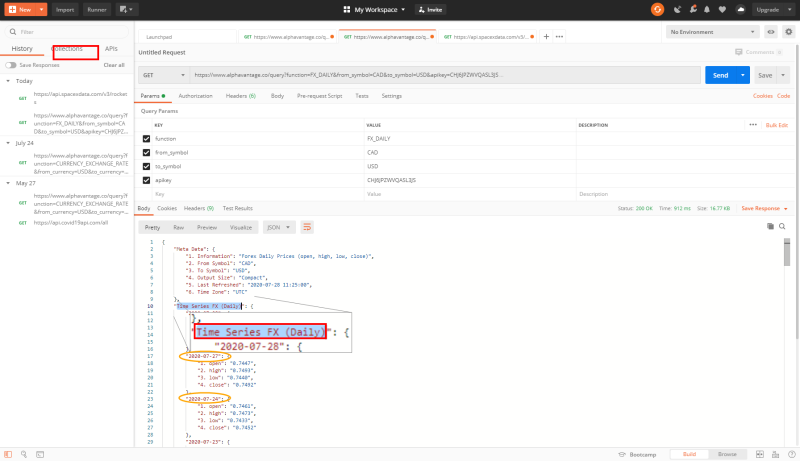
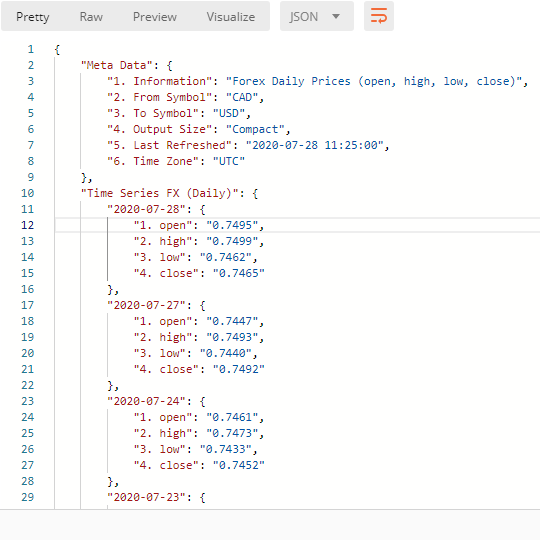
- As you can see from the screenshot below, the Attributes are not accessible directly from the Root, i.e., there is an element name prior the "{" sign, followed by random dates (acting as a Variable, as they are incremented automatically). In this case, the element name is Time Series FX (Daily).
- Use the steps described in Common Steps and Information from step 9 until the end to build your API Profile.
- For the api:set attr="RepeatElement" value="X" tag, replace the X value with the value which is placed prior the "{" sign in the following format /value/ format. In this case, it is Time Series FX (Daily) followed with "/%/" to declare that the dates are Variables.
- If the Attributes have special characters such as an underscore, spaces, or words with accents, place the value as is into square brackets [] in the other:xPath section.
| In Postman | Becomes | In Notepad |
|
= |
|
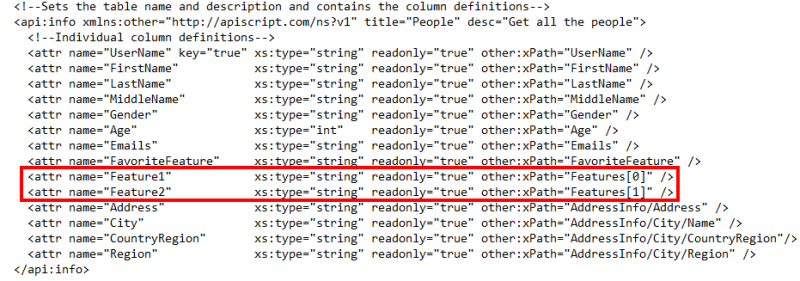
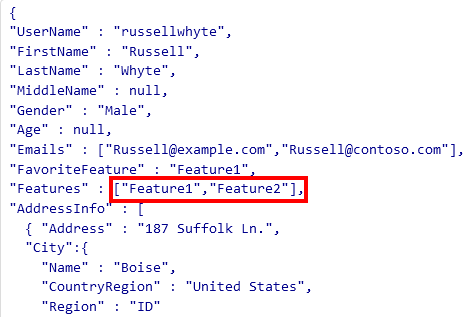
If some of the Items are presented as an Array or a List like presented in the screenshot below, in the other:xPath section, you will have to declare each Element by placing them in square brackets [] and replacing their value with numbers starting with 0.
| In the API Provider documentation | Becomes | In Notepad |
|
= |
- Once the .rsd file is completed:
- Follow the procedure described in Settings for Custom API to create and configure a new Connection (refer to Authentications for more details).
- Follow the procedure described in Add an Extraction and Setup the Extraction Panel to define the extraction.
- Follow the procedure described in Run an Extraction to retrieve the data.
Editing an API Profile
- Go to the location where the API Profiles are stored.
- Select the API Profile file (.apip extension) you want to retrieve the Tables from and change its extension .apip to .zip.
- Use your file archiver software (WinZip, 7-zip or Winrar ) to extract them.
- With a text editor such as Notepad, open the .rsd file you want to edit.
- Refer to the procedures described in Common Steps and Information and Specific Steps to Advanced Case depending on the tree structure of the API Profile you want to edit.
The value inside the <api:set attr="RepeatElement> tag will give you an hint regarding the nesting level.
If there is a "/" in the <api:set attr="RepeatElement> tag, this means that the Attributes are at the Root level therefore, you need to refer to Common Steps and Information. If not, refer to Specific Steps to Advanced Case.
Updating your API Profile in Data Sync
If you make some changes to your .rsd file and want these changes to be reflected in Data Sync, you need to re-create your Connection. In order to do so:
- Refer to the procedures described in Delete an Extraction and Delete a Connection to delete the extraction and the connection linked to the API Profile.
- Follow the procedure described in Settings for Custom API to create and configure a new Connection (refer to Authentications for more details).
- Follow the procedure described in Add an Extraction and Setup the Extraction Panel to define the extraction.
- Follow the procedure described in Run an Extraction to retrieve the data.


