Scenario 3: Self-hosted for Acumatica
Configure Acumatica
Before you install the template, import and publish the Sage Enterprise Intelligence customization project in Acumatica. It adds the OData inquiries that DataSync reads.
View your Acumatica version
- Log in to Acumatica.
- In the upper right corner, click Tool, then select About.
- Note your version, shown as
Acumatica 20XX RX.
Upload the project
- In the sidebar, select Customization, then click Customization Projects.
- Click Import.
- Select the file for your version in
...\20XX Release X\Acumatica\Acumatica ERP Projects, then click Upload. - Select the Sage Enterprise Intelligence project, then click Publish.
Count your tenants
- In the sidebar, select System Management, then click Tenants.
- Note the number of tenants listed.
Create the client ID and secret
- In the sidebar, select Integration, then click Connected Applications.
- Click +, enter
OAuth 2.0in the Client Name, and select Authorization Code in Flow. - Click Save then note the Client ID.
- Click Add Shared Secret, enter
OAuth Secretthen note the Value (Client Secret).
Prepare the redirect URI
- In Connected Applications, select your
OAuth 2.0application, then click the Redirect URIs tab. - Click +, then keep the page open to paste the DataSync callback URL.
Configure DataSync for Acumatica
Add a source with refresh
- Log in to DataSync, then click Connections.
- Next to Source Connections, click New.
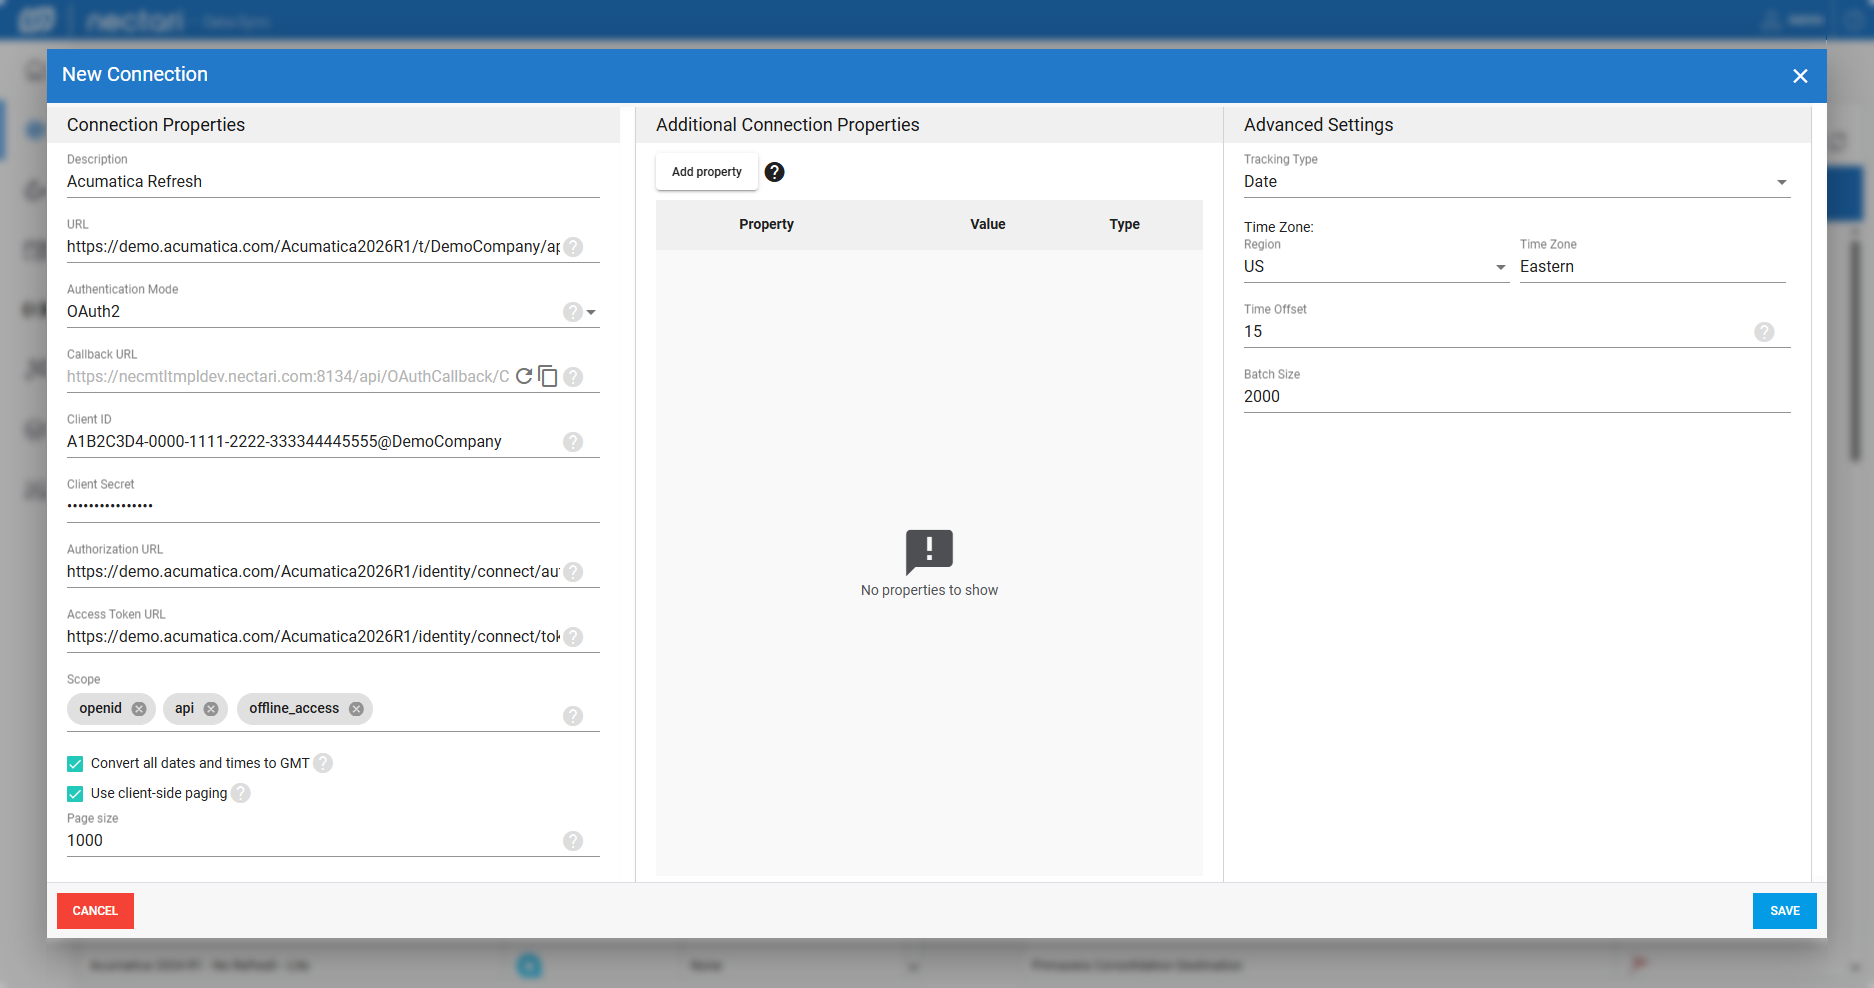
- Select Acumatica and fill in the Connection Properties:Description
Acumatica RefreshURLYour Acumatica URL. Keep the%20for spaces.Authentication ModeOAuth2, the recommended mode. Basic is also supported.Callback URLRedirect URL to add to the connected application in Acumatica.Client IDClient ID from Acumatica.Client SecretValue (Client Secret) from Acumatica.Authorization URLYour base Acumatica URL followed byidentity/connect/authorize.Access Token URLYour base Acumatica URL followed byidentity/connect/token. - In Advanced Settings, set Tracking Type to Date and match the time zone to the Acumatica server.
- Click Save.
Add a source without refresh
- Next to Source Connections, click New.
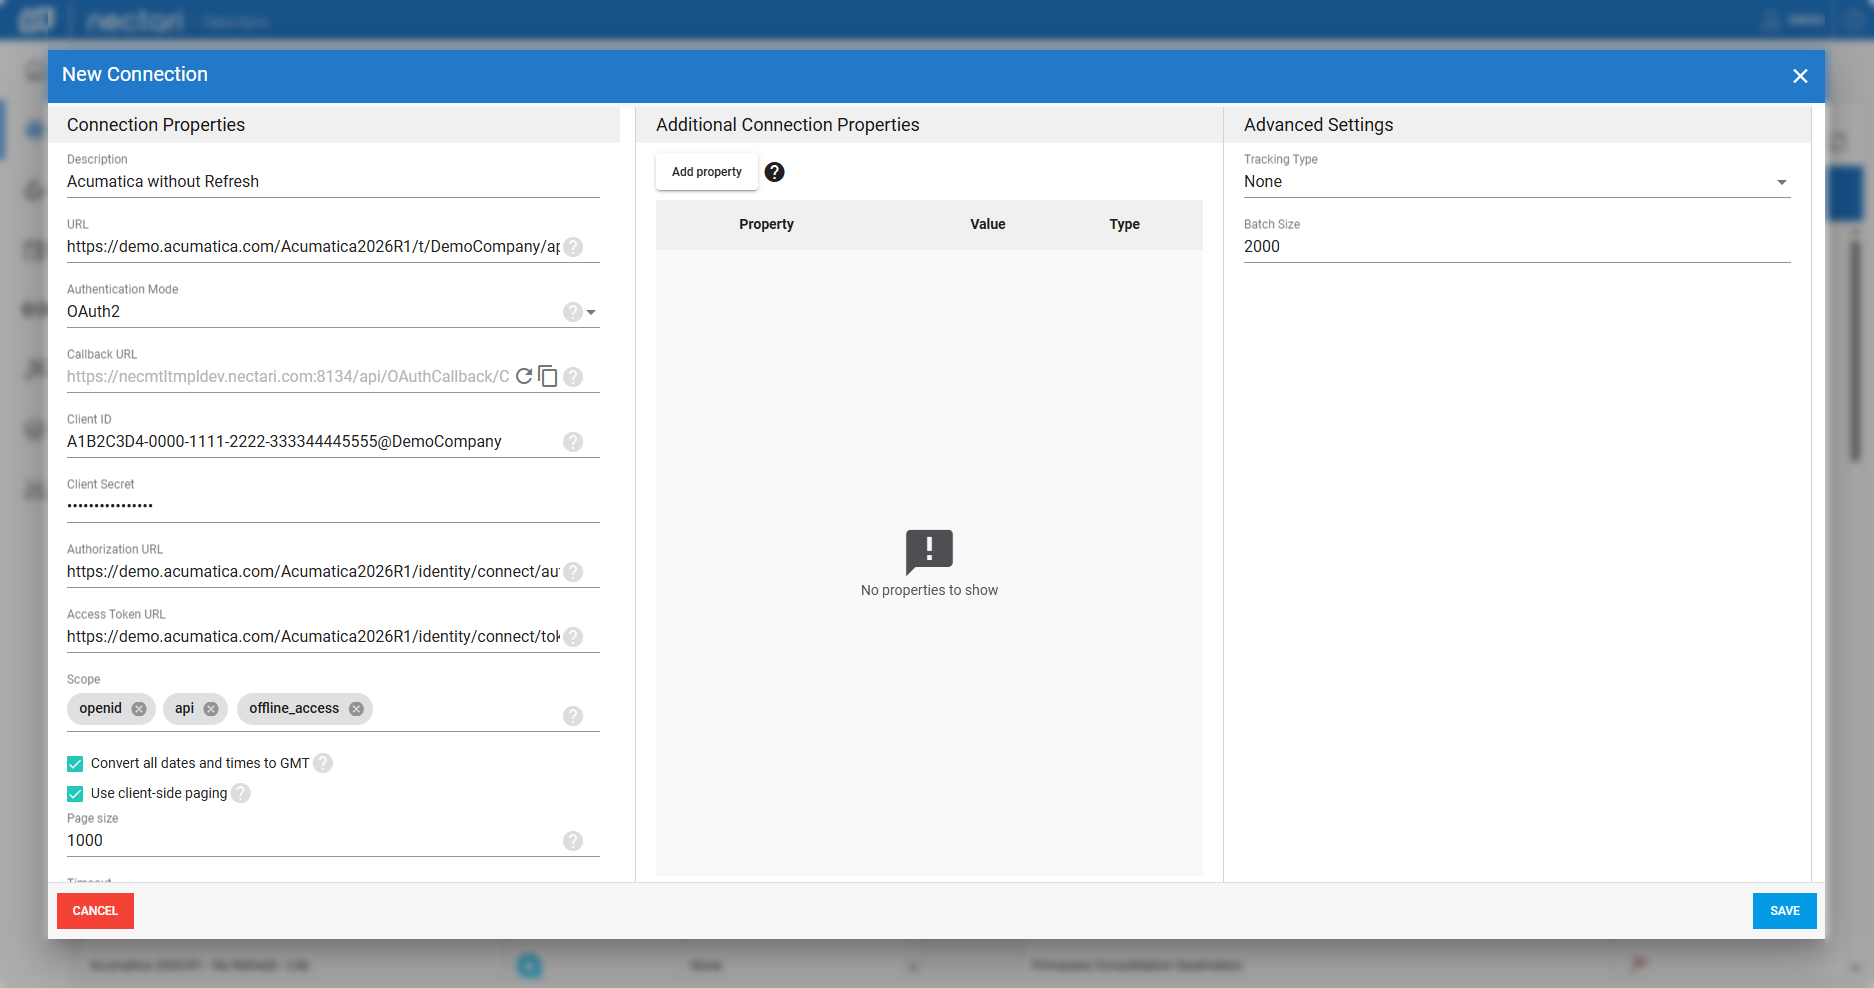
- Select Acumatica and fill in the Connection Properties:Description
Acumatica without RefreshAll other propertiesSame values as the refresh connection. - Click Save.
Create a destination connection
- Next to Destination Connections, click New.
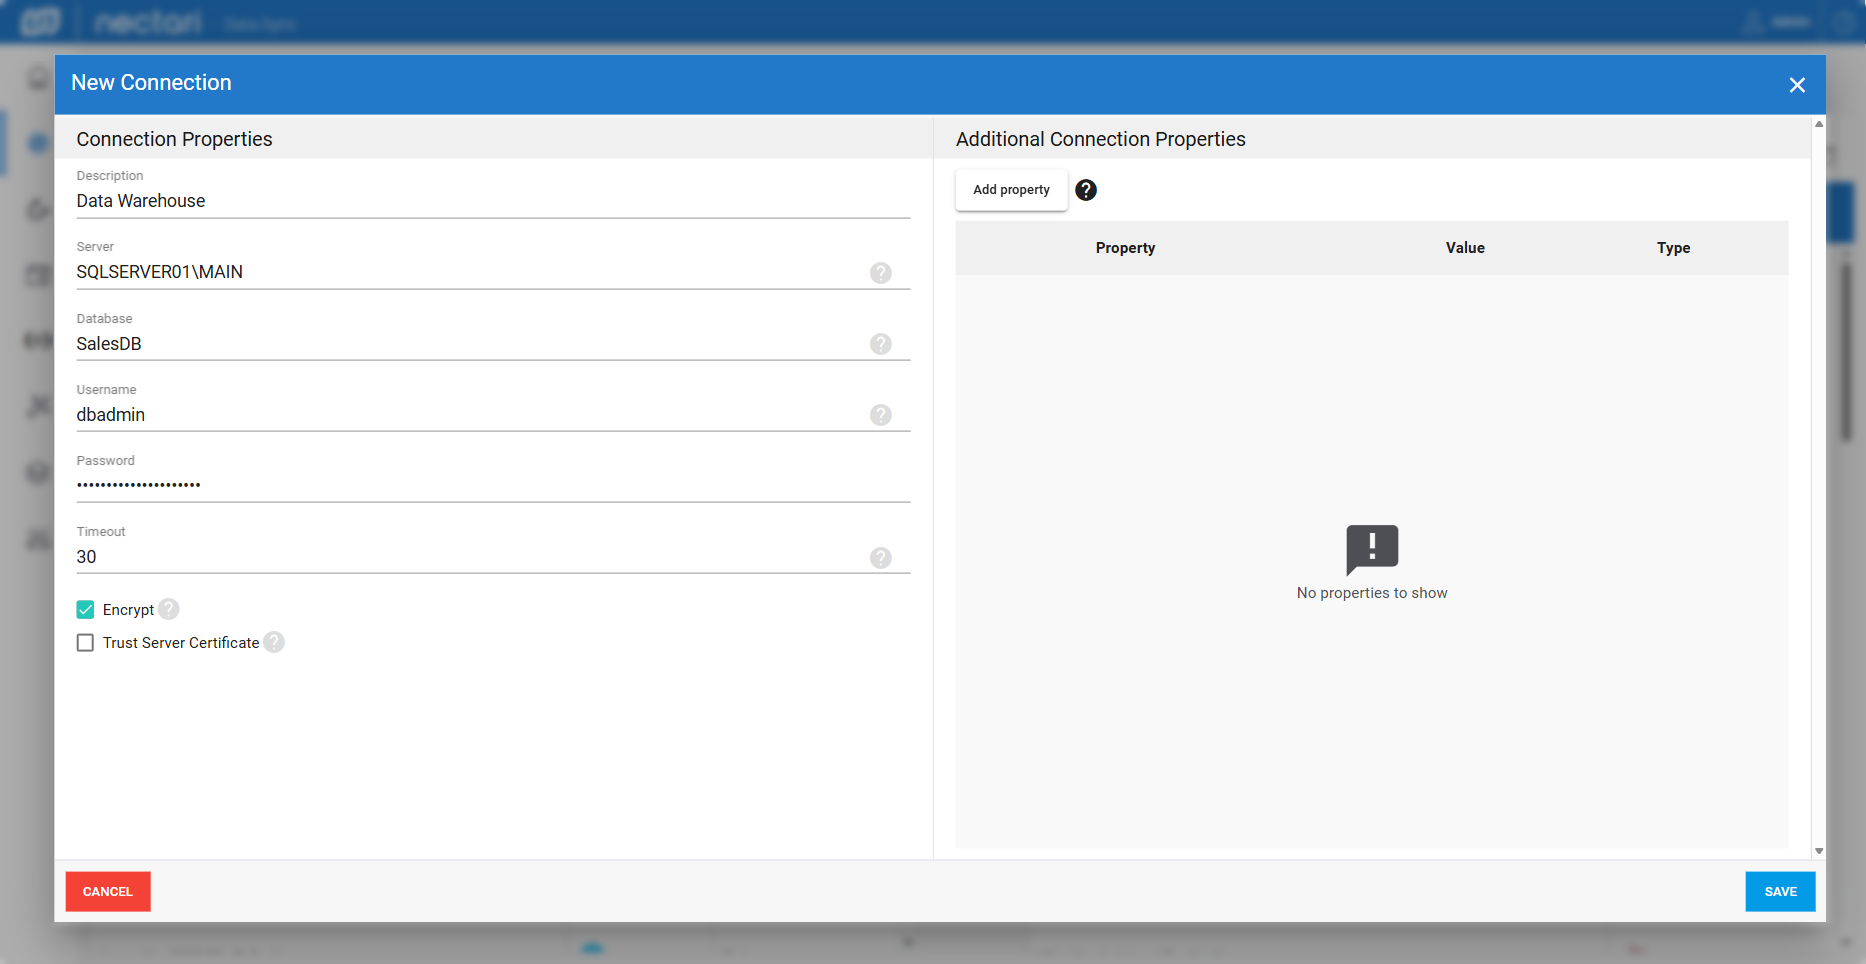
- Select SQL Server or Oracle, depending on your data warehouse.
- In Description, enter
Data Warehouse. - Enter the Server, Database, Username, and Password.
- Click Save.
Import the refresh extraction
- In the sidebar, select Extractions, then click Import Extraction in the top right corner.
- Drag the
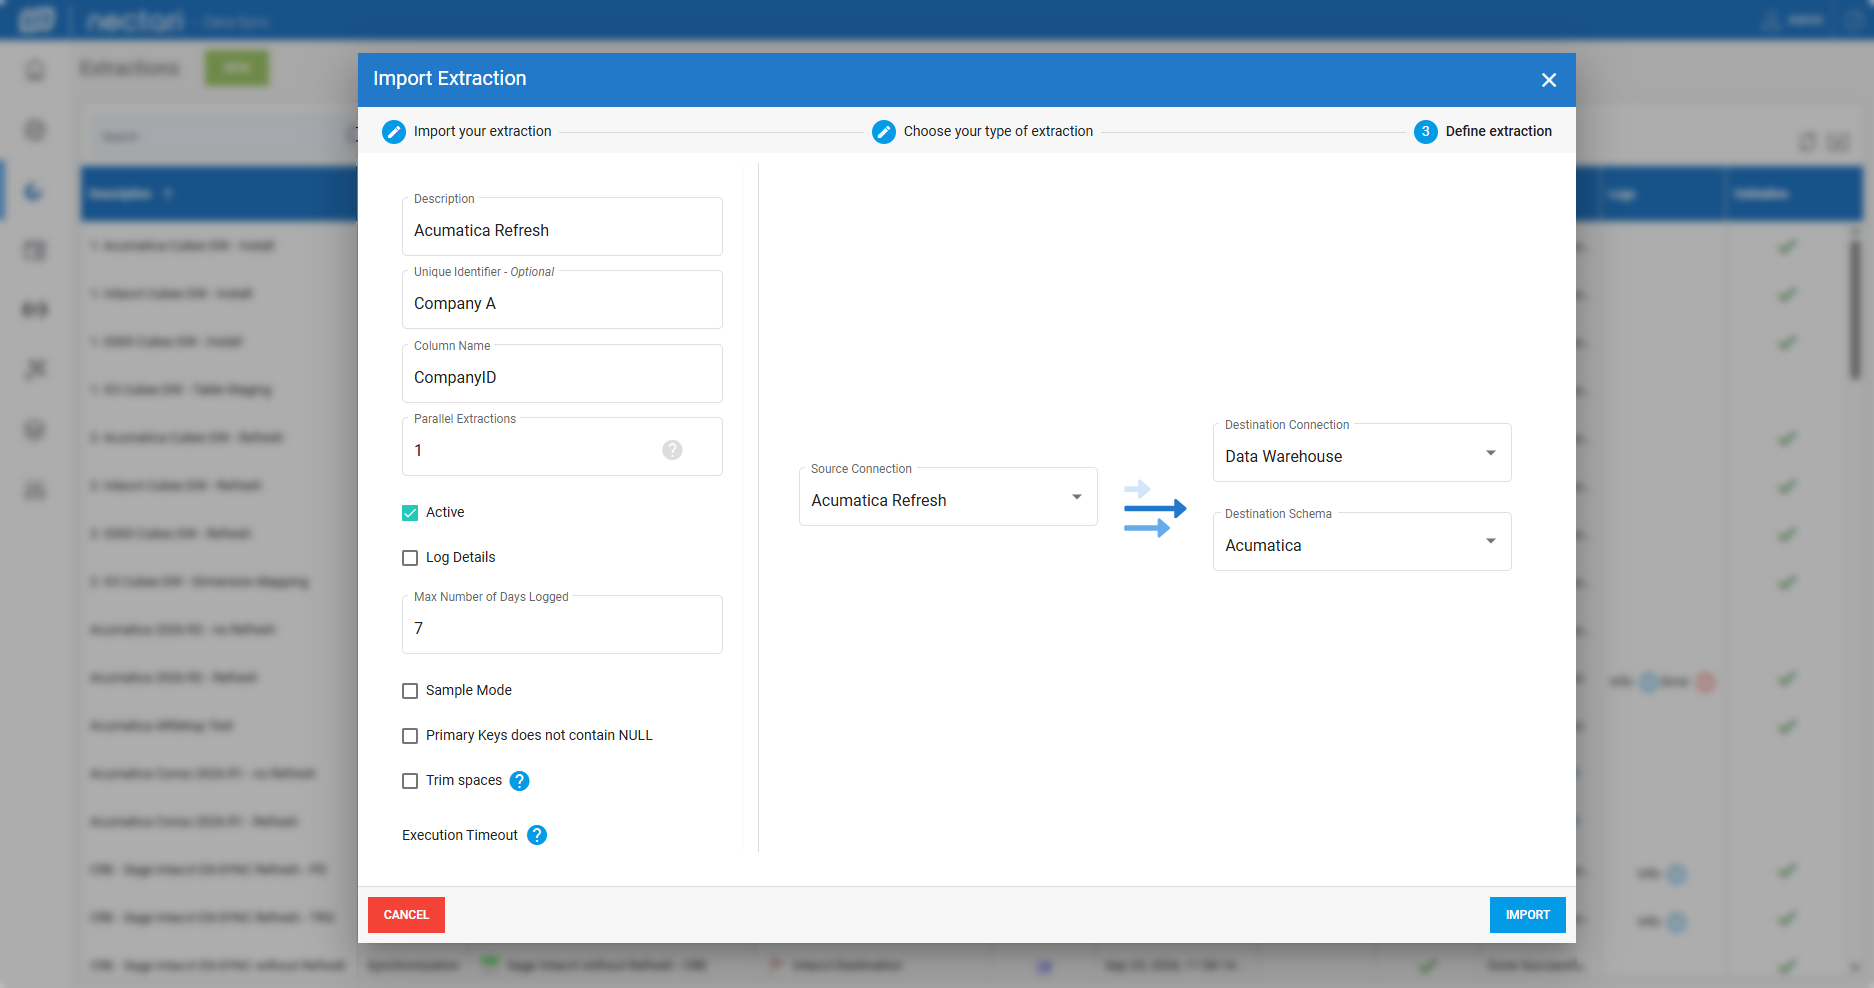
DS_202X.0.X.XXX_Acumatica SYNC Refresh.zipfile, then click Next. - In Description, enter
Acumatica Refresh. - In Unique Identifier, enter your company name.
- In Column Name, enter
CompanyID. - In Source Connection, select Acumatica Refresh.
- In Destination Connection, select Data Warehouse.
- In Destination Schema, click Add and enter
Acumatica. - Click Import.
Import the no refresh extraction
- Click Import Extraction in the top right corner.
- Drag the
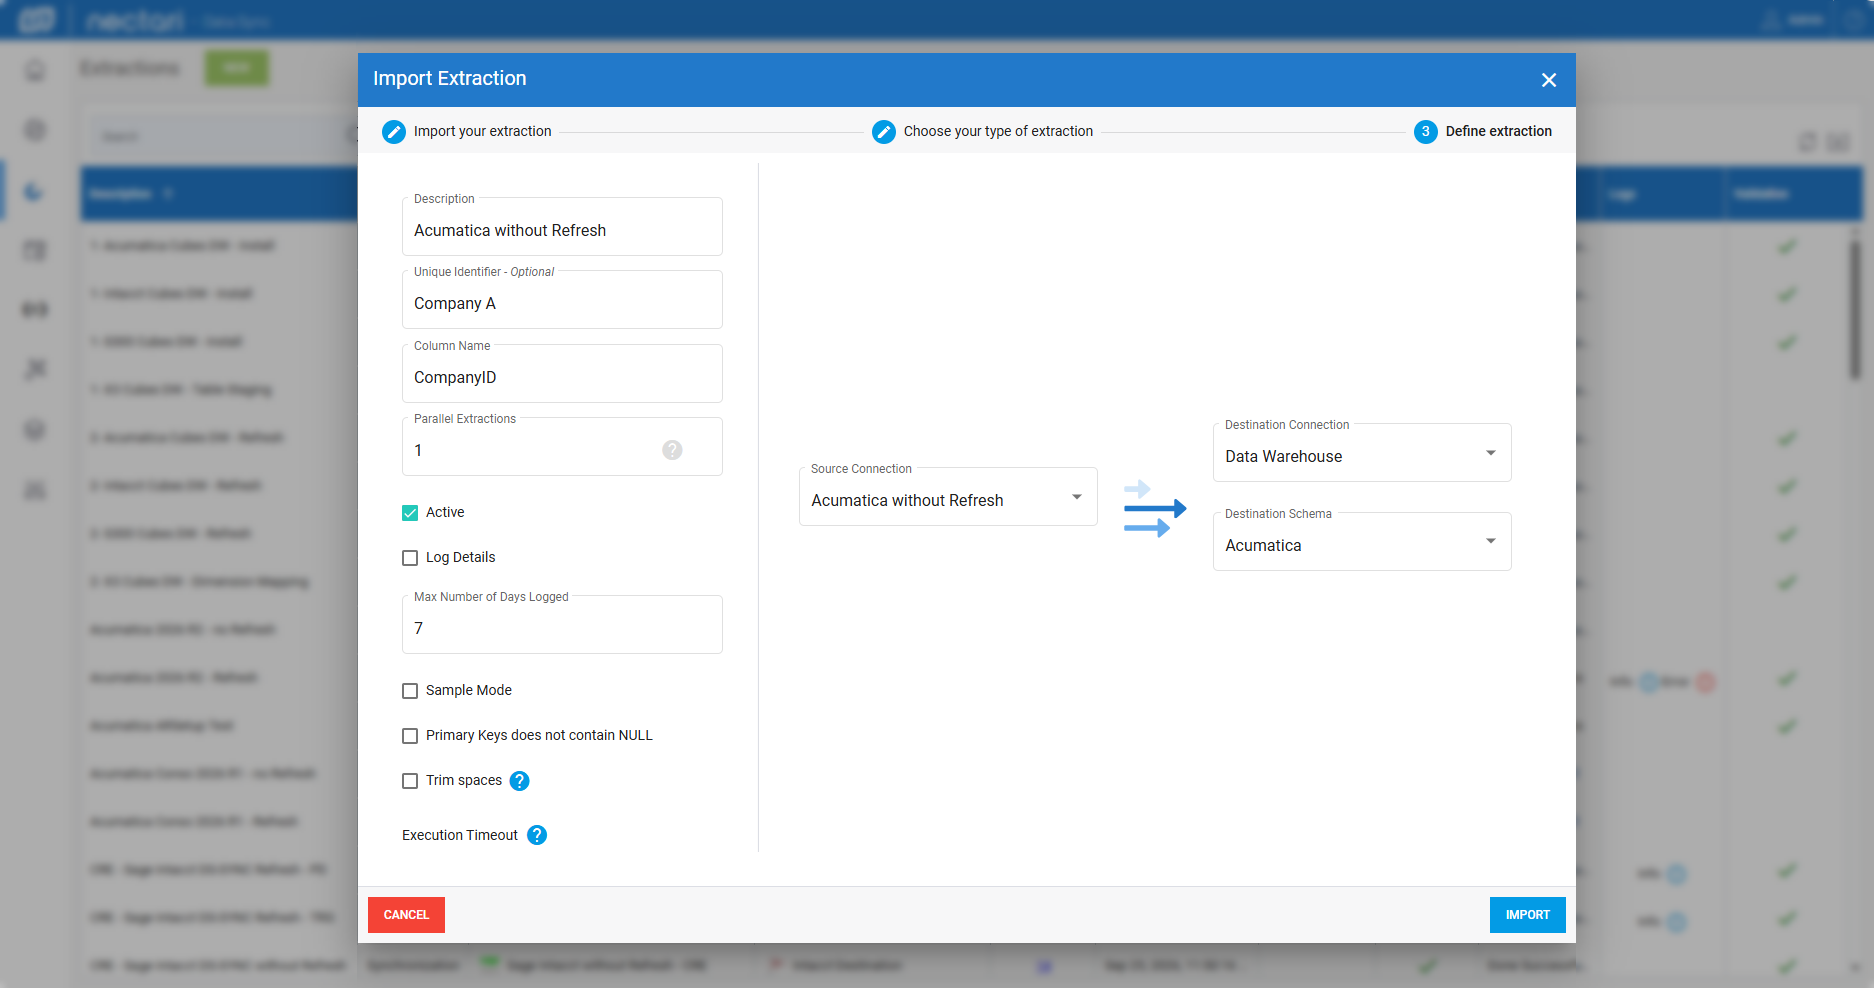
DS_202X.0.X.XXX_Acumatica SYNC NoRefresh.zipfile, then click Next. - In Description, enter
Acumatica without Refresh. - In Unique Identifier, enter your company name.
- In Column Name, enter
CompanyID. - In Source Connection, select Acumatica without Refresh.
- In Destination Connection, select Data Warehouse and in Destination Schema, select Acumatica.
- Click Import.
Run the extractions
- Select the first extraction in the list and click Validate and Build in the top right corner.
- Select Drop the previously created object and recreate the objects based on the new definition.
- Click Build.
- Select the same extraction and click Run Extraction Now.
- Select the tables, set the load mode to Truncate and Load, then click Run.
- Repeat for each remaining extraction.
Schedule an incremental load
- In the sidebar, select Scheduler, then click New.
- In Description, enter
Acumatica Incremental Load. - In Action, select Incremental Load.
- In Extraction, select Acumatica Refresh.
- Select Active.
- In the left panel, select Weekly, then set Start On and At.
- Change the Time Zone if needed, then click Save.
Schedule a full reload
- Click New, then in Description, enter
Acumatica Truncate and Load. - In Action, select Truncate and Load.
- In Extraction, select Acumatica without Refresh.
- Select Active.
- In the left panel, select Weekly, then set Start On and At.
- Change the Time Zone if needed, then click Save.
Schedule deleted records processing
- Click New, then in Description, enter
Acumatica Process Deleted Records. - In Action, select Process Deleted Records.
- In Extraction, select Acumatica Refresh.
- Select Active.
- In the left panel, select Daily, then set Start On and At.
- Change the Time Zone if needed, then click Save.
Load large tables by partition
Load by partition
Use loading by partition for large tables. Partition on a date or an integer field, and avoid date fields that can contain future dates.
Configure Sage Enterprise Intelligence for Acumatica
Set up the data source
- Log in to Sage Enterprise Intelligence, then click the gear icon in the navigation panel.
- Select Env. & Data Sources.
- In the Data Sources panel, click +.
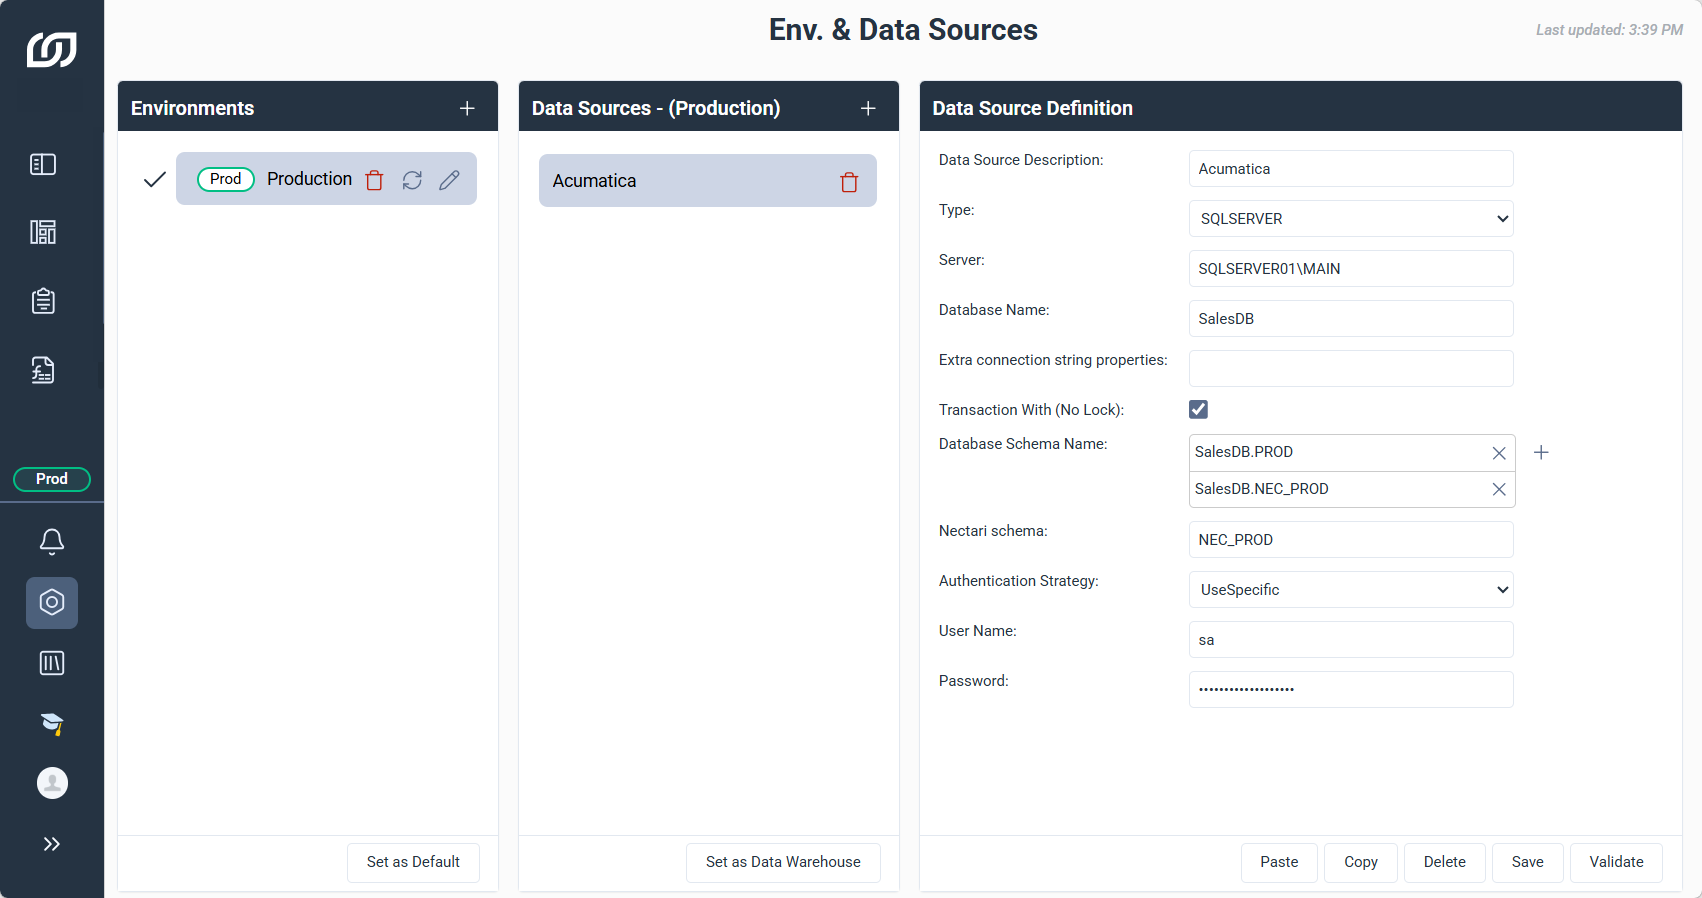
- In Description, enter
Acumatica. - In Type, select SQLSERVER or ORACLE, depending on your data warehouse.
- Fill in the other fields:Database NameSQL ServerData warehouse database name created in DataSync. Case sensitive.SIDOracleData warehouse database name. Case sensitive.PathOracleOracle instance port number.PoolingOracleTurn on pooling and adjust its parameters if needed.Database Schema NameClick + twice and enter
DatabaseName.PRODandDatabaseName.NEC_PROD.ReplaceDatabaseNamewith your database name.NEC_PRODcan use another name, in capital letters only.Nectari SchemaEnterNEC_PROD.Authentication StrategySelect UseSpecific.User Name, PasswordSQL Server or Oracle user and password. - Click Validate, then Save.
Set up the OLAP data source
- In the Data Sources panel, click +.
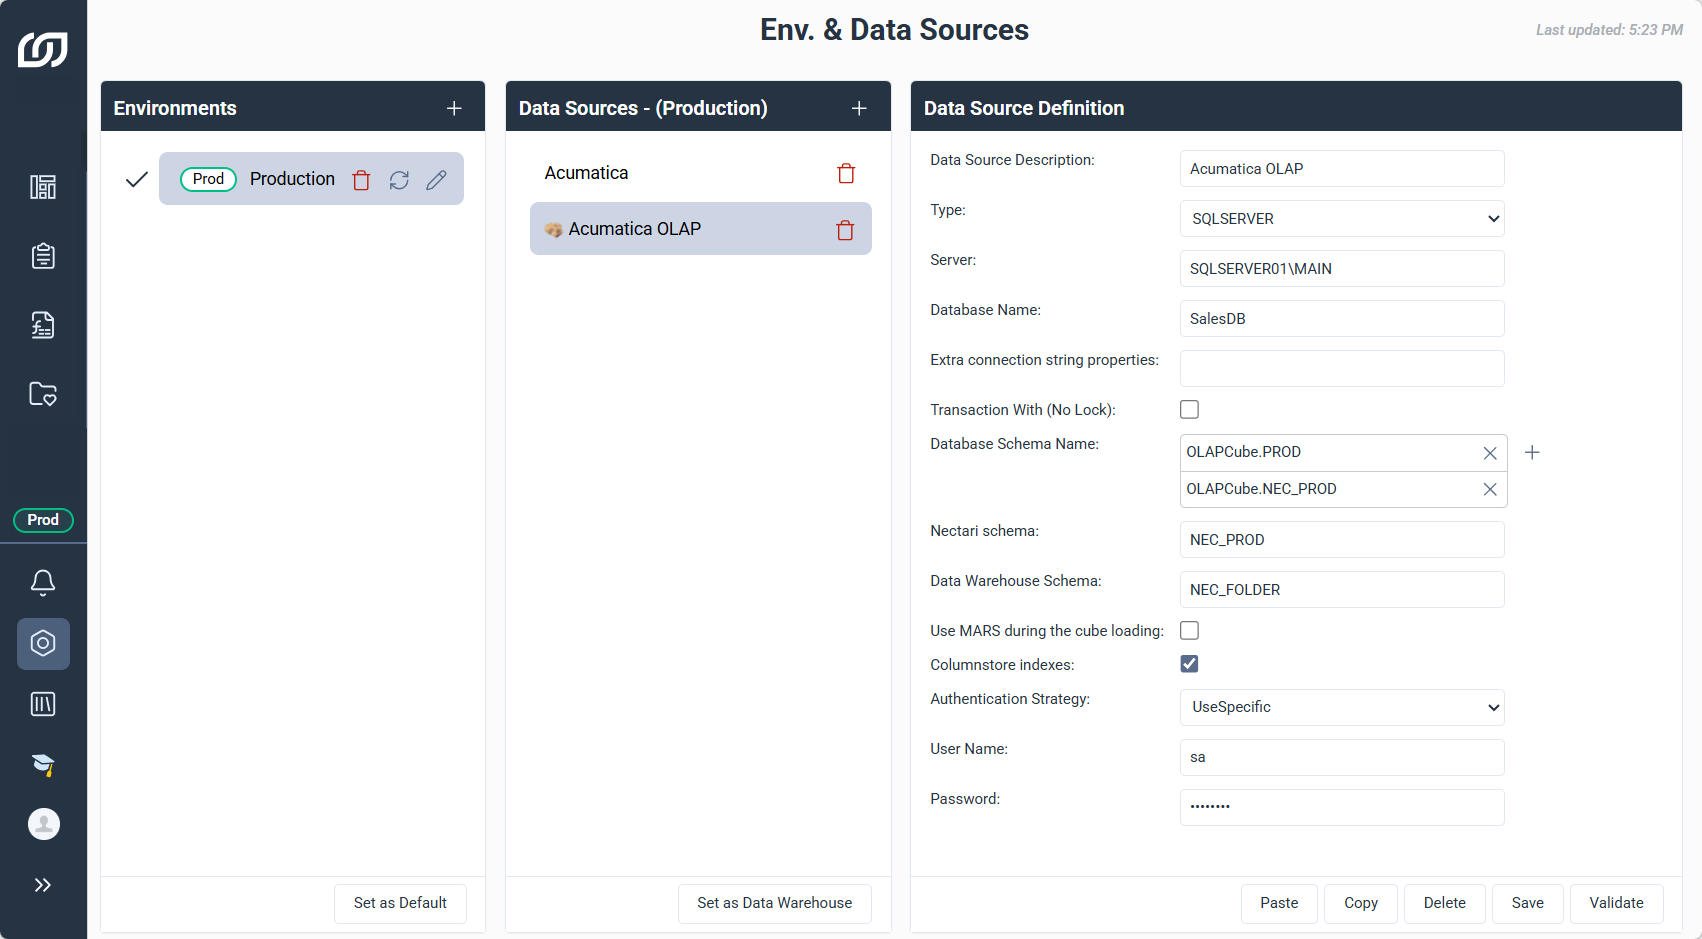
- In Description, enter
Acumatica OLAP. - In Type, select SQLSERVER or ORACLE, depending on your data warehouse.
- Fill in the other fields:Database NameSQL ServerData warehouse database name created in DataSync. Case sensitive.SIDOracleData warehouse database name. Case sensitive.PathOracleOracle instance port number.PoolingOracleTurn on pooling and adjust its parameters if needed.Database Schema NameClick + twice and enter
OLAPCube.PRODandOLAPCube.NEC_PROD.NEC_PRODcan use another name, in capital letters only.Nectari SchemaEnterNEC_PROD.Authentication StrategySelect UseSpecific.User Name, PasswordSQL Server or Oracle user and password. - Click Validate, then Save.
- Select Acumatica OLAP in the Data Sources panel, then click Set as Data Warehouse.
- In Data Warehouse Schema, enter
NEC_FOLDER. - Click Validate, then Save.
Set up Acumatica real-time finance
Complete this section only if you use real-time financial reporting. Since Release 1 Version 2026, uploading the project to Acumatica is optional.
Upload the real-time project
Optional- In Acumatica, select Customization, then click Customization Projects.
- Click Import, then select the real-time file in
...\Acumatica\Acumatica ERP Projects\Add-ons. - Click Upload.
- Select the Real Time project, then click Publish.
Create the global variable
- In Sage Enterprise Intelligence, select the gear icon from the navigation panel.
- Select Global Variables, then click Add New Record.
- In Key, enter
@@AcumaticaURL, then in Variable Type, select Constant. - In Description, enter
Acumatica Server URL. - In Data Type, select Text.
- Enter your Acumatica URL, then click Create.
Set up real time data
- In the Administration section, select Env. & Data Sources.
- In the Data Sources panel, click +.
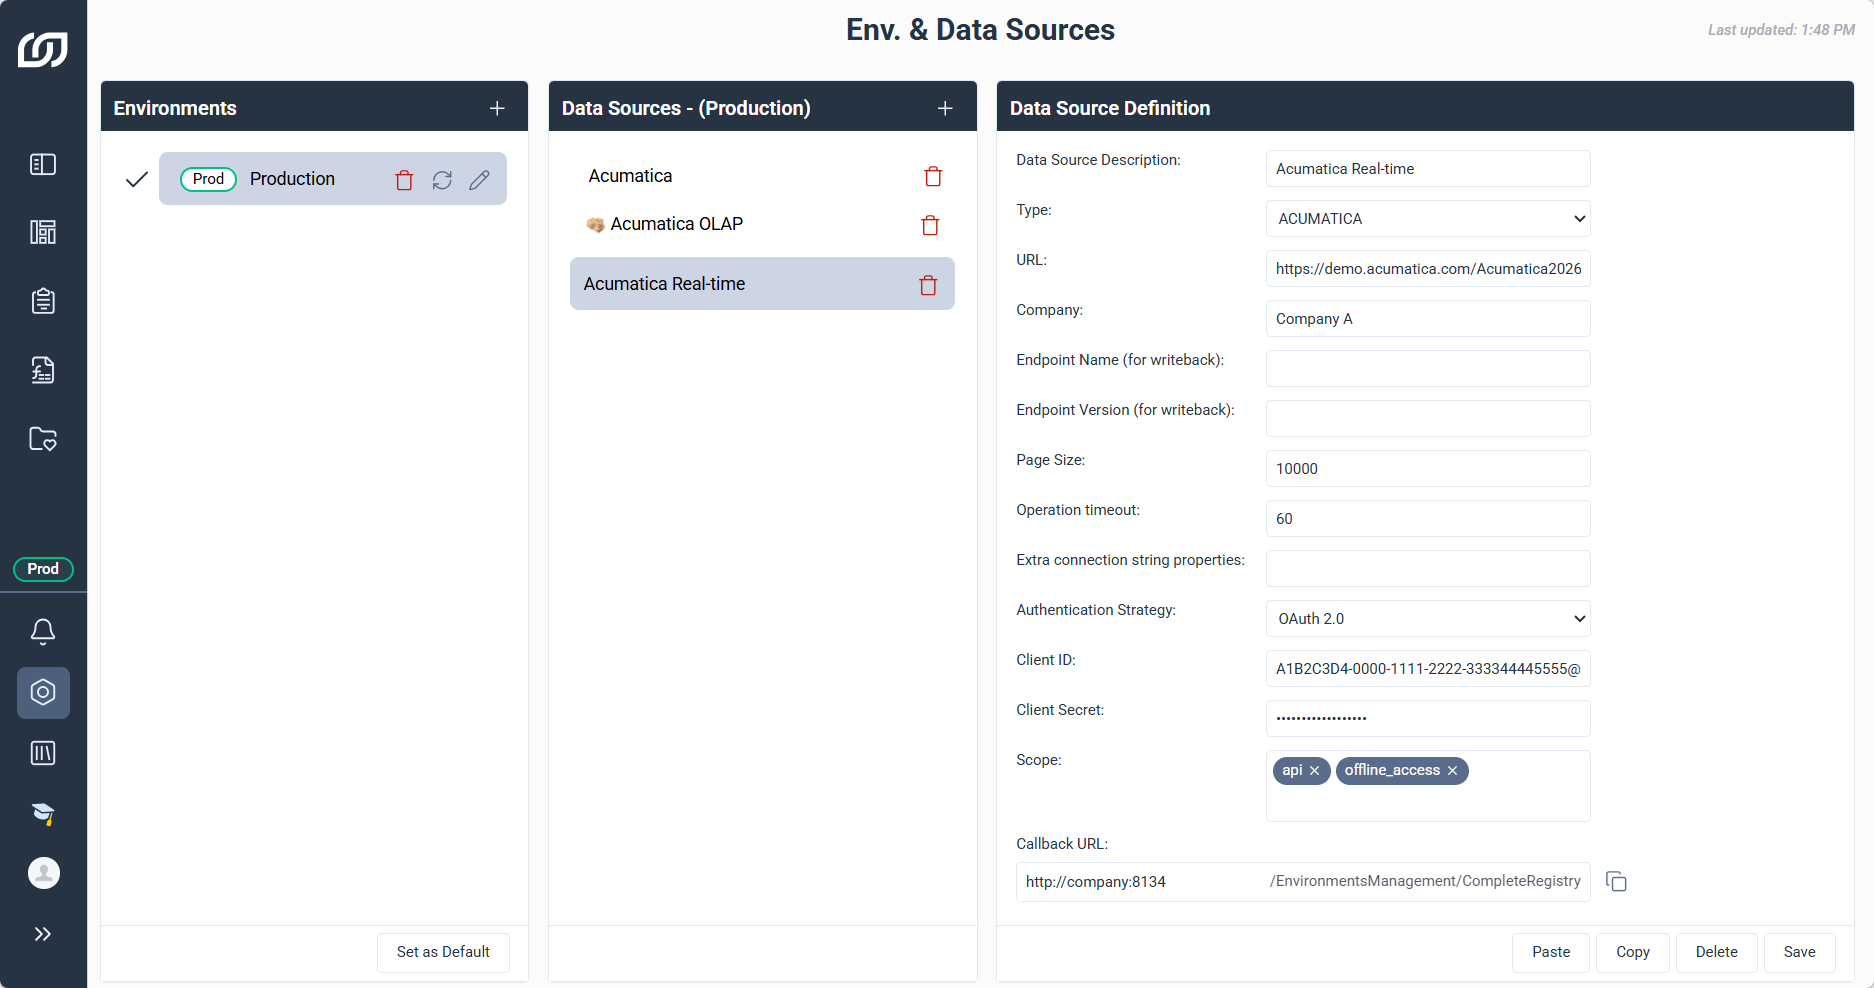
- In Description, enter
Acumatica Real-time. - In Type, select Acumatica.
- Fill in the other fields:URLYour Acumatica URL. Keep the
%20for spaces.CompanyName of your Acumatica company (tenant).EndpointsOptionalEndpoint name and version from Acumatica, to activate the writeback.Authentication StrategyOAuth2, the recommended mode. Basic is also supported.Client IDClient ID from Acumatica.Client SecretValue (Client Secret) from Acumatica.Scopeapiandoffline_access.Callback URLRedirect URL to add to the connected application in Acumatica. - Click Validate, then Save.
Add Acumatica manufacturing reporting
Complete this section only if you use manufacturing reporting. Since Release 4 Version 2026, uploading the project to Acumatica is optional.
Upload the manufacturing project
Optional- In Acumatica, select Customization, then click Customization Projects.
- Click Import, then select the manufacturing file in
...\Acumatica\Acumatica ERP Projects\Add-ons. - Click Upload.
- Select the Manufacturing project, then click Publish.
Import the Acumatica template
Import the template
- In the sidebar, expand Templates, then click Import Template.
- Select the template zip file from
...\Templates - Official\20XX Release X\Acumatica\WebServer. - In Current Data Sources Description, click Bind a Data Source and select Acumatica Data Source.
- Click Next.
- In Data Models, clear Add for the objects to skip, then click Next.
- Select the environment.
- Enter
NEC_PRODin Schema for Custom Objects andPRODin Schema for Acumatica. - Click Next and review the execution report.
Set up Sales and Finance reporting for Acumatica
Complete this section only if you have the Data Management add-on and use the Sales and Finance cubes. The cubes run on a separate data warehouse database, so they need their own source connection and extractions.
Add the source connection
- Log in to DataSync, then click Connections.
- Next to Source Connections, click New.
- Select SQL Server and fill in the Connection Properties:DescriptionEnter
Data Warehouse (Source).ServerData warehouse server, such asSQLSERVER01\MAIN.DatabaseData warehouse database, such asSalesFinance.Username, PasswordData warehouse database user and password. - In Advanced Settings, set Tracking Type to Date and match the time zone to the Acumatica server.
- Click Save.
Import the table staging extraction
- In the sidebar, select Extractions, then click Import Extraction in the top right corner.
- Drag the
DS_20XX.0.X.XXX_Acumatica OLAP ETL Staging.zipfile, then click Next. - In Description, enter
Cube - Table Staging. - In Source Connection, select Data Warehouse (Source).
- In Destination Connection, select Data Warehouse.
- In Source Schema and Destination Schema, select
PROD. - Click Import.
Import the dimension mapping extraction
- Click Import Extraction in the top right corner.
- Drag the
DS_20XX.0.X.XXX_Acumatica OLAP ETL Refresh.zipfile, then click Next. - In Description, enter
Cube - Dimension Mapping. - In Source Connection, select Data Warehouse (Source).
- In Destination Connection, select Data Warehouse.
- In Source Schema and Destination Schema, select
PROD. - Click Import.
Run the cube extractions
- Select the first extraction in the list and click Validate and Build in the top right corner.
- Select Drop the previously created object and recreate the objects based on the new definition.
- Click Build.
- Select the same extraction and click Run Extraction Now.
- Select the tables, set the load mode to Truncate and Load, then click Run.
- Repeat for each remaining extraction.
Set the data warehouse
- Log in to Sage Enterprise Intelligence, then click the gear icon in the navigation panel.
- Select Env. & Data Sources.
- Select the Acumatica data source and click Set as Data Warehouse.
- In the Data Source Definition panel, select Columnstore indexes.
- Click Validate, then Save.
Build and load the cubes
- Select OLAP Manager in the sidebar, then click Manage in the right panel.
- Select all the template cubes from the list.
- In the Manage panel, select the environment.
- Click Confirm, select the checkbox to confirm that current cube data will be lost, then click Yes.
- Click Manage again and select all the built cubes.
- In Action, select Load All and the environment, then click Confirm.
Schedule the cubes
Schedule regular refresh jobs to refresh or reload your OLAP cubes.
Acumatica template installation complete
The Acumatica template is installed. Continue with these pages to adapt it to your company and review its content.