Adding Central Points After the Installation
You can have multiple Central Points in SEI your Login page. You need to edit the Web Client’s Web.config file to add Central Points to the list. You also need to edit the Scheduler API’s Appsettings.json file so that the OLAP Manager and Distribution Service communicate with these Central Points.
Step 1: Edit the Web Client
-
Open the Web.config file located in C:\Program Files\
-
Locate the CentralPointDictionary tag.

-
Edit the parameters as follows in the add line:
-
key: Enter the name of your Central Point.
-
value: Enter the path of your Central Point.
-
-
To add another Central Point:
-
Copy the entire add line.
-
Edit the parameters.
-
-
Save the Web.config file.

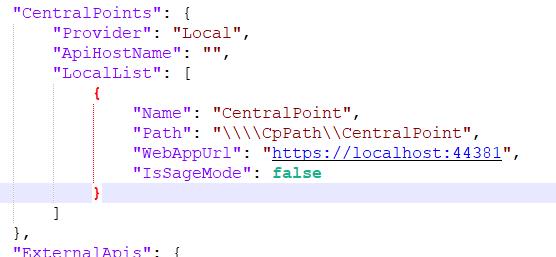
Step 2: Edit the Scheduler API
-
Open the Appsettings.json file located in C:\Program Files\
-
Locate the LocalList tag.
-
Edit the parameters as follows:
-
Name: Enter the name of your Central Point.
-
Path: Enter the path of your Central Point. Make sure to enter //// before the path.
-
WebAppUrl: Enter the URL of your Web Client.
-
IsSageMode: Enter
-
-
To add another Central Point:
-
Copy all parameters mentioned above with the opening and closing brackets ({ }).
-
Edit the parameters.
-
-
Save the Appsettings.json file.