Importing the Template
For each environment, the following previously configured information will be required:
- ERP Database Name
- ERP Schema
- SEI Custom Schema
-
Template zip file (this file must match the SEI version)
Download the Template file: TPL_Major.Minor.Build_Sage300.zip, where Build represents the build number of the template.
Running the Import Template Process
-
In the upper-right hand corner, click the
 to access the Administration section.
- In the Administration section, click the
 Templates drop-down menu in the left pane.
 - Select
 Import Template.
 -
Choose the specific location where the new templates will be installed and click Next.
 Note
NoteUsually, the Root folder is used.


-
In the Import Template window, click Select files....

- Find the folder where you saved the Template.zip file in order to select it then click Open.
- In the Data Sources Mapping screen, associate the Data Sources (ERP) listed in the Received Data Sources Description column (those from the template) with the Data Sources you previously defined in the Central Point (listed in the Current Data Sources Description column)
- In the Received Data Sources Description column, ensure that only the Data Sources options you want to use from the template are selected.
-
In the Current Data Sources Description column, click Bind a Data Source to access the drop-down list containing the existing Data Sources and click Next.
In the next screen all of the Templates content is displayed, against what the Central Point already has.
By default, on the first install, everything will be set to Add (leave everything by default) .
- In the case of a first installation, the first four columns will display None and Never Installed,
the next three will detail the Template content, and the last three gives you the choice to
Add, Update or Skip during the installation.Note
In the case of an update, you can refer to Updating the Template for more details.

-
Click Next (this can take time).


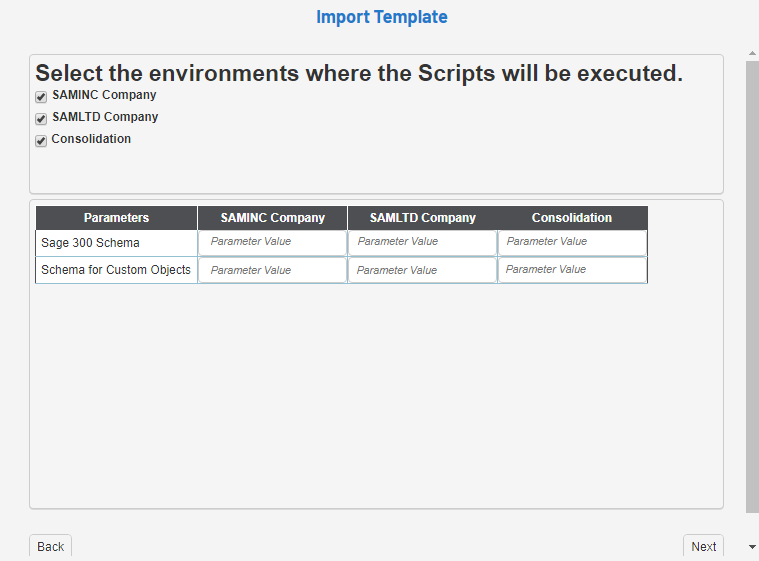
- Once this has been completed, a window will be prompted to input the necessary parameters to create the custom objects.
-
If more than one Environment have been created, you will see a column per Environment. You can unselect an Environment checkbox, in which case the Global Scripts will not run in it.
-
Complete the parameters, see examples below and click Next.


-
After importing, an execution report will be produced.
NoteThe first section is for the ERP Data Source and the one below it is for the Cube Data Source.
You can click the
 button to see the details of each script individually. If no failures
are reported, close the window.
button to see the details of each script individually. If no failures
are reported, close the window.


-
If any of the scripts failed to run, a fail icon
 will be displayed. Click the fail symbol to
view the Report Preview window, which shows the respective SQL script.
will be displayed. Click the fail symbol to
view the Report Preview window, which shows the respective SQL script. Copy this script, debug, and run it separately if needed. Users who are proficient with SQL can debug it straight in the Report Preview window and run it by clicking on the Try to rerun button.


Updating the Template
Some considerations you must take into account before starting:
- Making fresh backups of both the SEI database and Central Point before doing a template update is highly recommended.
- Check the SEI Data Models and SEI custom SQL objects that may have been delivered with the initial template version, as you might lose these customizations upon updating.
- You must have a template version that matches the software version installed.
When performing an upgrade of the SEI software, it will only update the software and not the template. In other words, the existing SEI Data Models and Views won't be affected.
After a software upgrade, it is not mandatory to systematically perform a template update. A template update is useful if you have encountered problems with specific SEI Data Models or SEI custom SQL objects as it includes fixes.
To update a template:
-
After having mapped the Data sources, select the checkboxes of the objects you want to upgrade and click Next.
 Note
NoteBy default, no option in the Update column will be selected. If there is a new Data Model / View the Add option will be selected. Select Skip if you want to ignore it.
ImportantIf you select the Update option, it will overwrite the existing SEI objects associated with that Data Model or connected to the others (dependencies). Please note that if any customizations have been done, they will be lost.

- Select the environment in which the scripts will be executed and click Next.
- Complete the parameters and click Next.
- In the Execution report window, If any of the scripts failed to run, a fail icon will be displayed. Click the fail symbol to
view the Report Preview window, which shows the respective SQL script.
-
Copy this script, debug, and run it separately if needed. Users who are proficient with SQL can debug it straight in the Report Preview window and run it by clicking on the Try to rerun button.
Web Browsers have updated their policy regarding Cookies and these changes must be applied to your Web Client if you want SEI embedded into your ERP website, or use Single Sign-On (SSO). Refer to Cookie Management for more details.